FooGallery PRO Commerce includes a product gallery template, allowing you to set up your commerce gallery quickly and efficiently. Here we take a look at how to do this, and some of the features included in the product gallery.
The Product Gallery template is exclusive to FooGallery PRO Commerce and is designed specifically for online stores. The main focus is on creating a stunning gallery to showcase your products while making it simple for customers to find (and buy) the items they want.
To accomplish this, the product gallery layout utilizes various settings by default. For example, it automatically adds filtering by product catalogue and includes an Add to Cart button. You also have the option of displaying Sale Ribbons, adding product pricing and more. Of course, you can change any of these settings to suit your needs.
Building A Product Gallery
The easiest way to build your product gallery is to create dynamically by loading images from WooCommerce. For this, you would need to set up your products in WooCommerce, and then add media from WooCommerce. This ensures that your filters match your product galleries and automatically adds sales ribbons to relevant items. It also means that your pricing, captions and descriptions are all automatically filled in from your products, so you don’t need to do this manually.
However, it is possible to create a product gallery manually. Below is an example of a product gallery that we built without using WooCommerce. In this scenario, you can add the necessary details to the images by filling in the caption, description, or other fields when the image is uploaded. You are also able to manually insert Sale Ribbons in this way. Plus you can add a button, and a button URL, for adding items to the cart.


Product Gallery Features
The product gallery layout is geared towards helping you sell your images. To accomplish this, it comes with several settings built-in. This include:
- Pricing: you can choose to display the product prices as your caption or description.
- A product gallery lightbox: while your gallery uses thumbnails, customers want to see a larger image of the product. A lightbox allows you to open this full-size image above the gallery, where you can include more product details.
- Product variations: if you have different sizes, colors, or other product variations, you want these to show in the product gallery so that customers are aware of their options. But you don’t want to include each variation as a separate product. It’s preferable to show them as part of the description when the full-size image is opened in the lightbox.
- Add to Cart buttons: having a buy button in the gallery itself, or in the lightbox, makes it easier to purchase. This means fewer steps in the buying process and less chance that a customer will change their mind. You can also create additional buttons, such as a “View Now” option.
- Sale Ribbons: you want to be able to highlight promotional items. You can do this by using a sale ribbon on the gallery thumbnail, or showing a marked down price. WooCommerce product galleries will identify promotional items from your WooCommerce settings. You can also apply this to Out-of-Stock, Backorders and Favorite items.
- A product filter or a search bar: make it easy for customers to find what they’re looking for. Product category filters or a search function do just that and are essential for a product gallery. When using WooCommerce, these filters will pull from your WooCommerce products.
Click here for a look at our Product gallery demo site.
How To Build Your Product Gallery
Below, we walk you through the steps for setting up your gallery to sell your products using FooGallery PRO Commerce:
Step 1: Get Set Up
To get started, you’ll need to have your WordPress site up and running, with WooCommerce installed and your products created in WooCommerce. (If you need a guide to setting up your WooCommerce products, check out this article.)
You’ll also need to install and activate FooGallery PRO Commerce.
Step 2: Create a Gallery
The next step is to add a product gallery. To do this, click on Add Gallery in the FooGallery menu. You’ll then see a new gallery page, where you’ll create your product gallery. Give your gallery a title.
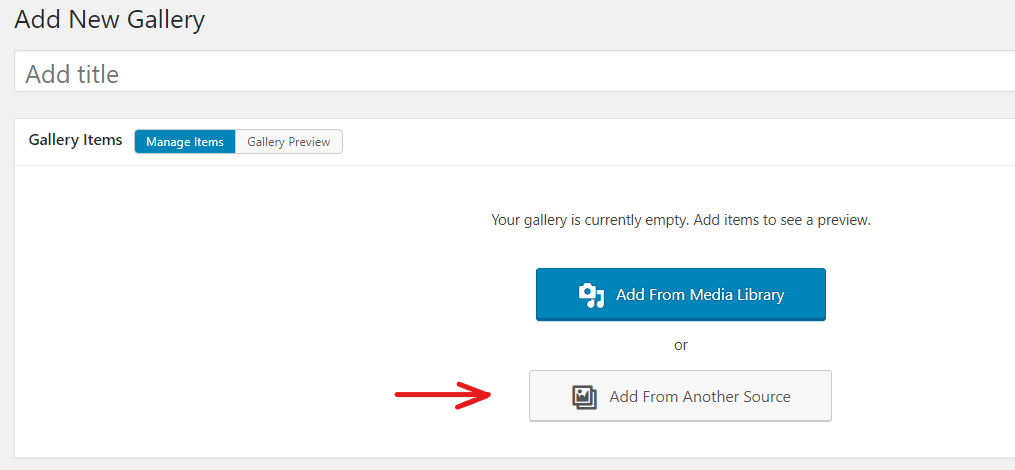
You then need to add your media. For a product gallery, you want to add the images of your products from WooCommerce:
- Select the Add From Another Source button.
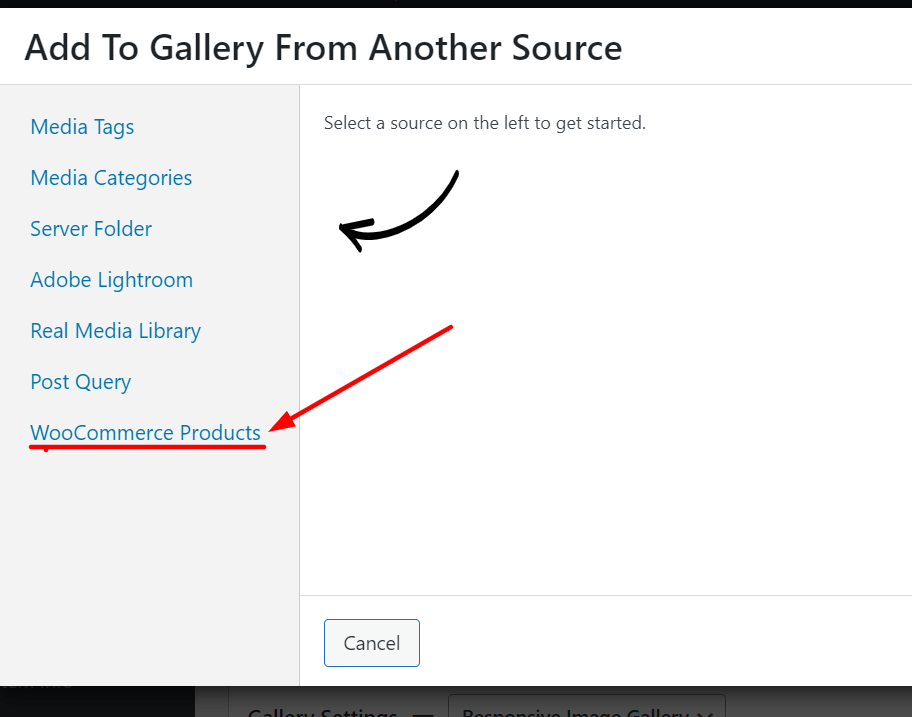
- A new panel will open giving you a selection of datasources from which you can select your images. Select WooCommerce products.
- You’ll now see a range of options for setting up your gallery. For example, you can select one or more product categories (as set up in your WooCommerce products). You can also determine how the gallery is sorted, the stock status, how many products are included and the caption sources.
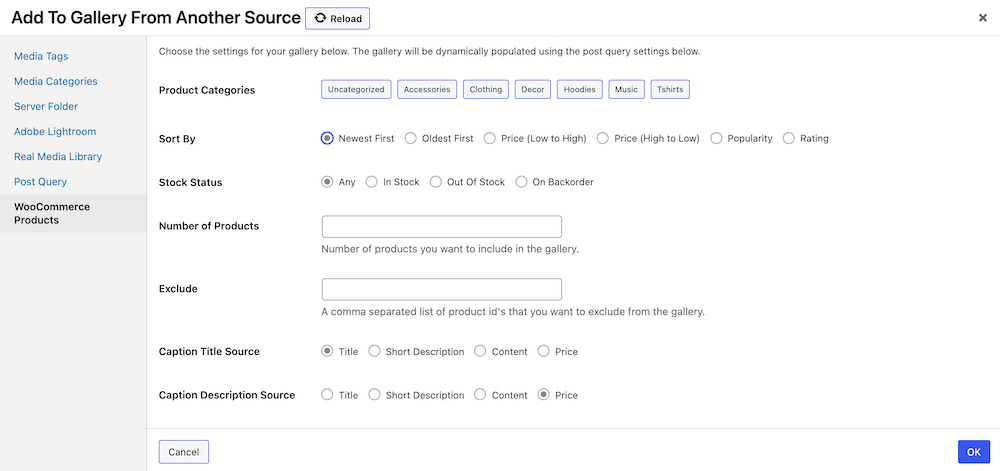
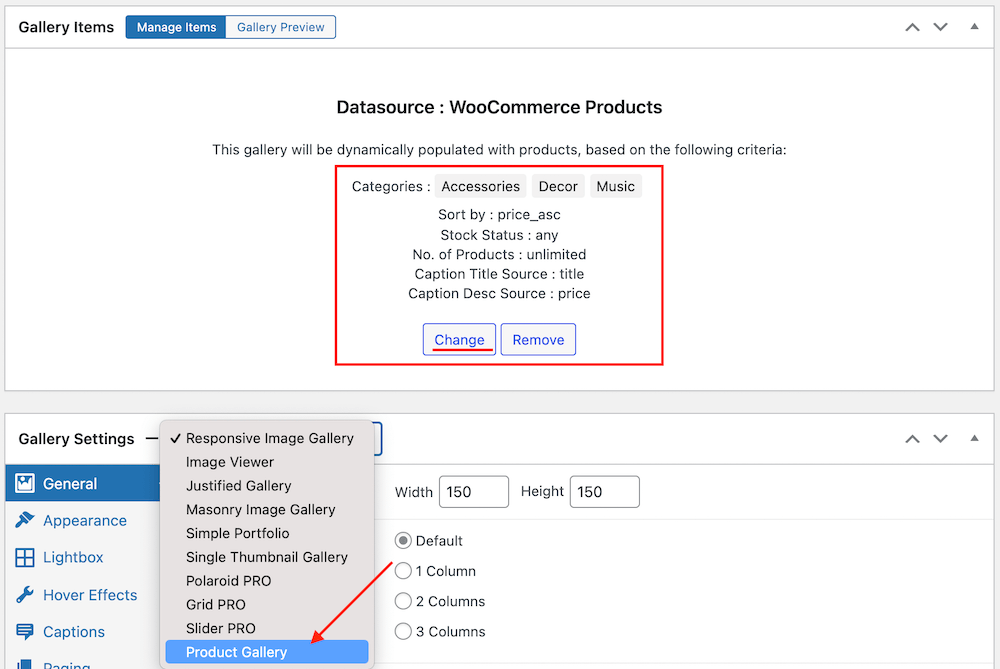
- Once this is done, you can click on OK and the gallery will pull in the corresponding images from WooCommerce. You’ll see confirmation of these settings in the Gallery Items panel. If you need to change any of these settings, simply click on the Change button and update.
This is a dynamic gallery, so if you make changes to the selected product categories in WooCommerce, the changes will reflect in the gallery. Note that you may need to wait several hours for this to reflect.
You can now also select the Product Gallery layout from the drop down list of gallery templates.
Step 3: Style the Gallery
Your product gallery is now set up and should be ready to go. This template has been designed to include all of the features you would need to effectively display and easily sell your products.
Below, we’ve given you a quick rundown of the specific features and settings included in the product gallery. You can also adjust these settings to suit your needs. (We’re not going to cover the general settings like appearance, hover and lightbox, but you can of course change these as well.)
Filtering – Simple frontend filtering is enabled for your product gallery, so that customers can filter the gallery by category (as set up in your WooCommerce products). You can add more advanced filtering features, or make use of the multi-level filtering.
The Search function is not enabled for the product gallery, but you can choose to enable it.

Ecommerce Settings – Here you can adjust the existing settings for elements such as your Sale Ribbons and Add to Cart buttons.
There are six different ribbons to choose from, with various positions and colors. You can use these for Sales, Featured or Backorder items, choosing the ribbon type and text for each. Alternatively you can use a dash-icon instead of text. There is an additional ribbon-type, recommended for using with Out of Stock items.
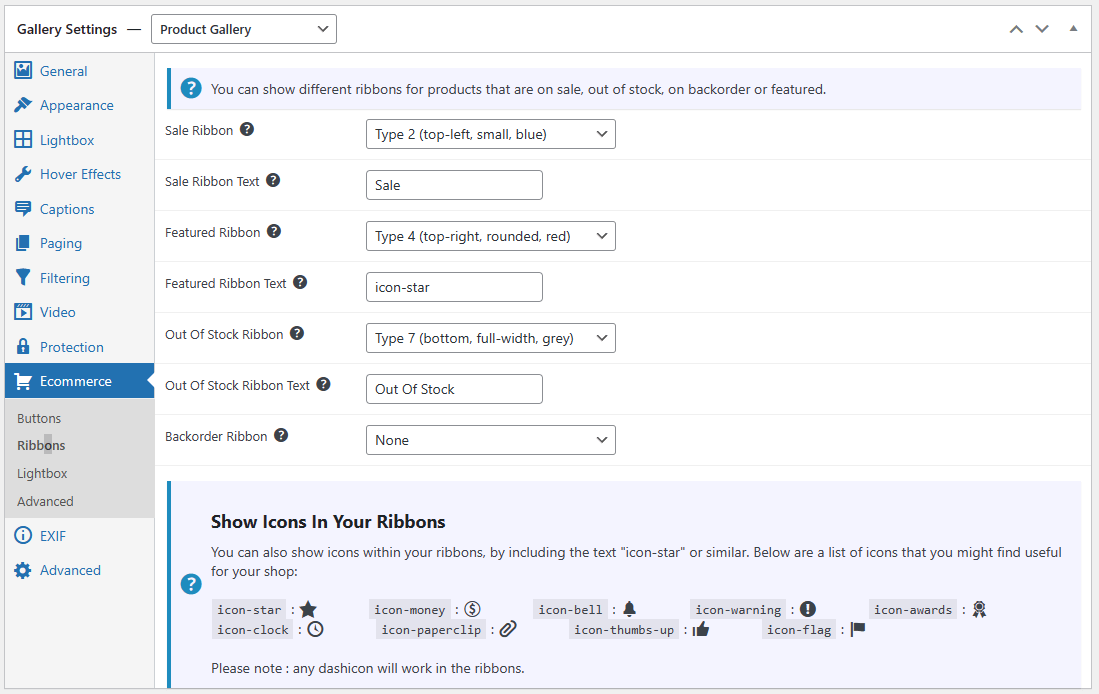
The Add to Cart button text can be changed and you can opt to hide the button for the gallery thumbnails. There is also a View Product button which can be shown. This can be used to redirect customers to a product page or to open the product page in a lightbox. The Select Options button is used when there are product variations – you can show or hide this and you can change the text.

Ecommerce Lightbox Settings – The lightbox settings determine which features are included with the products when opened in the lightbox. Here you can choose on which side to display the product info. Plus you can show or hide the Add to Cart and View Product buttons.
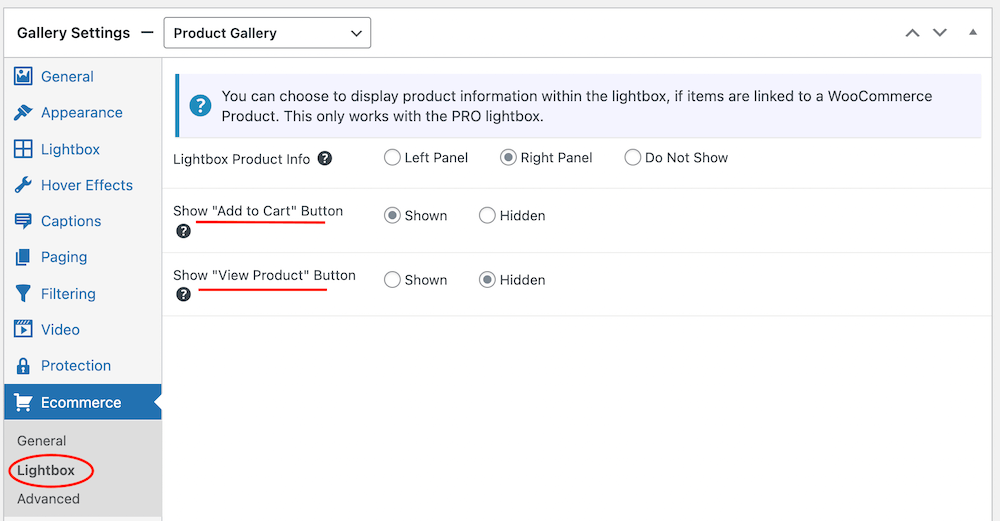
So you could, for example, hide your Add to Cart buttons on the gallery, and just show them in the lightbox, or vice versa.
The Advanced Ecommerce settings give you additional capabilities for setting up a Master product gallery. This is ideal for photographers selling large numbers of digital images.

Step 4: Publish and Display
Once you have set up and styled your gallery, you can hit publish. You can then use the FooGallery block in the block editor or the gallery shortcode to add your gallery to your page.