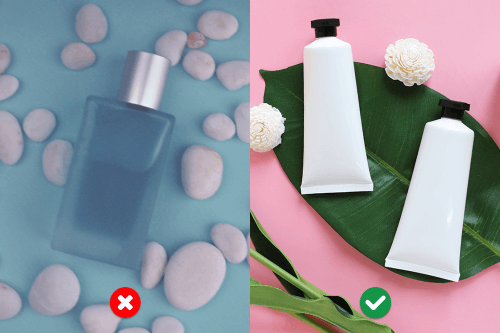
For any online store, a product gallery is a must. It is the focal point of your store and the reason customers want to buy your products.
The term ‘WooCommerce product galleries’ is generally attributed to the collection of images on the product page on a WordPress website using WooCommerce. The role of a product image gallery is to provide a visual representation of the products and give customers a better understanding of what they’re purchasing. So it’s easy to see how this can make or break your store. High-quality product images can prompt customers to buy and therefore have a direct impact on customer decision-making and conversion rates.
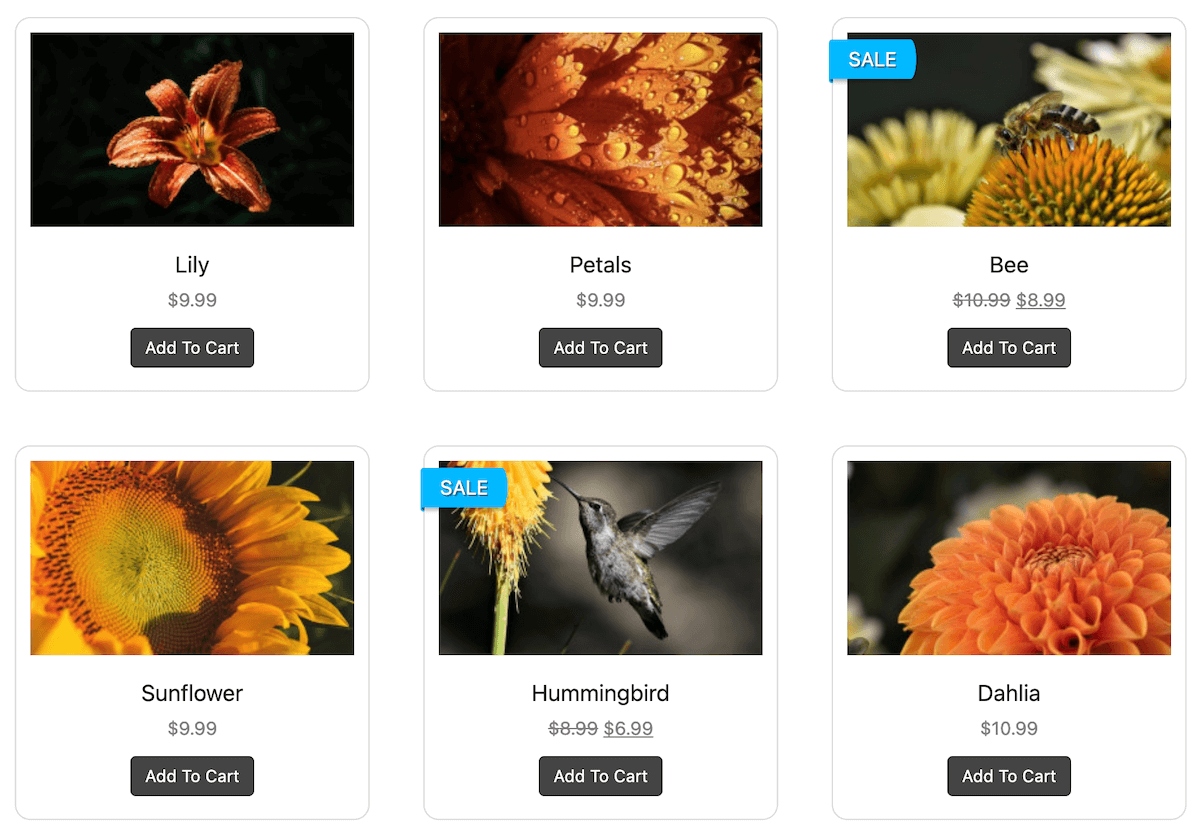
Product galleries can also enhance the overall aesthetic of the online store and align with the brand’s image and identity. They can provide a more interactive shopping experience, especially when they include features like zooming, 360-degree views, and videos. And there are SEO benefits to well-optimized product images, such as improved website loading speed and better search engine rankings.
Many plugins exist to either create and/or optimize product galleries in WooCommerce; many of them are product-page focused, such as by adding sliders, but we are going to look at plugins like FooGallery that let you create product galleries anywhere on your website.
Understanding WooCommerce Product Images
Given how important a product gallery can be for WooCommerce store owners, it’s worthwhile taking the time to do it properly. The first step in creating a product gallery is ensuring that you have great, high-quality product images.
There are plenty of helpful tutorials about taking product photos, like this beginner’s guide by All About Photo. But there are a few other pointers that you should also consider:
- Your photos shouldn’t be blurry, and should clearly show off your products.
- Edit your photos! Even basic editing can help improve the sharpness, focus, contrast, and other elements of your images, and there are plenty of online photo editors available that can help.
- Aim to have a nice mix of product photos and ensure they are relevant to your audience.
When creating your product gallery, you’ll be tempted to use hi-res photos to show off your products. But very hi-res generally means very big, which often results in a slow page load, which impacts both user experience and your SEO. The solution? Resize and optimize!
Consider your product image size. Selling products on your own site means that you aren’t governed by the image size requirements of marketplaces. But if you’re using WooCommerce, or you want all images to be the same dimensions, you will probably need to resize before uploading. (Quick note: using a gallery plugin saves you this hassle, as you can set the image thumbnail size. This means that, regardless of the full-size image dimensions, your gallery thumbnails can all be uniform).
You can also use an image optimization plugin when uploading images to your site. Look for a tool that will strip unnecessary metadata from the image and compress the size, without sacrificing too much on the quality.
And finally, when you upload your images, include captions and alt text. A good caption can drive audience engagement and improve conversions. Alt text is important, as it helps search engines and visually impaired users better understand your images.
Now that you have your product images, properly formatted, sized, and labeled, you need to display them. For that, you’ll need a WooCommerce product gallery.
Choosing the Right Product Gallery Plugin
A product gallery is designed to show off your product images in an enticing, eye-catching way, motivating potential customers to buy. For WordPress, the ideal solution is to use a plugin, to help you manage and customize your products.
While you could use the default WooCommerce product gallery, it doesn’t have the range of customization or functionality that you would find with a dedicated WordPress plugin. A gallery plugin simplifies the process of creating product galleries and comes with more advanced features. It also often means that you can place your product galleries anywhere on your site, including your shop page or homepage.

The ability to create custom product galleries, which can help boost your conversions, means that a WooCommerce gallery plugin can be extremely valuable. As with any plugin though, you need to factor in how suitable it is for your needs. Some of the key features to consider when looking for a WooCommerce product gallery plugin include:
- Product visibility: Default product galleries are contained within the product page, but some plugins let you display product galleries more strategically, such as on the homepage.
- Variety of display options: Different layouts, such as a grid, carousel, or slider views give you a more creative range, allowing you to customize how your products are presented to match the style of your store.
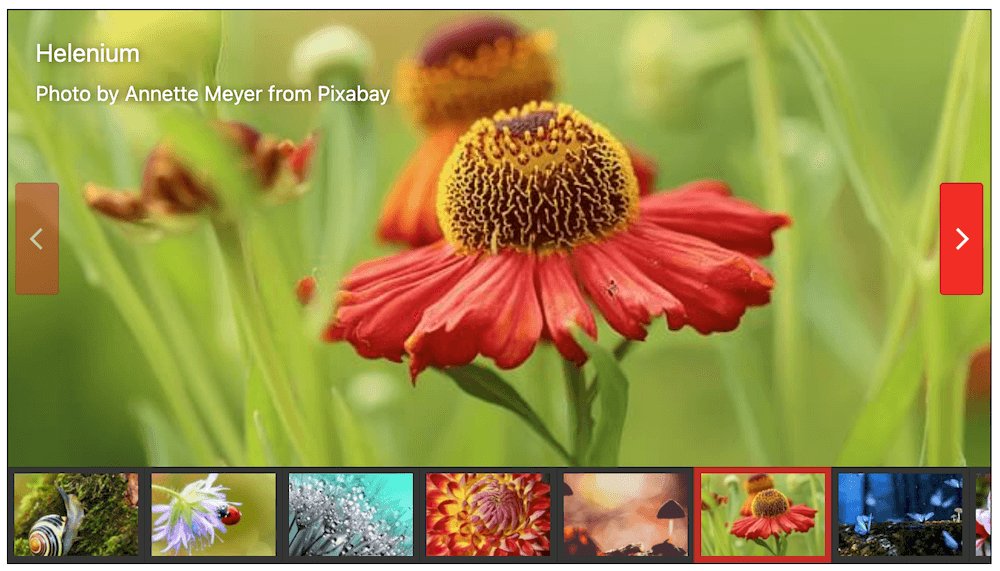
- Responsive design: It’s important your product gallery looks good and functions well no matter what device your customers are using.
- Zoom and lightbox features: Allowing customers to view product details closely, such as with zoom options, can improve their shopping experience. A lightbox allows you to open full-size images in a panel above your page, rather than full screen in a new tab.
- Thumbnail options: The ability to set the size of thumbnails, choose their location, and decide on how many to display at once, can help you tailor your gallery to suit your needs.
- Customization: Look for a plugin that allows you to change colors, adjust sizes, modify borders, and more.
- Compatibility: The plugin should be compatible with the latest version of WordPress and WooCommerce, as well as work well with other plugins you’re using.
- Ease of use: You shouldn’t need to know how to code to set up and customize your product gallery. Look for a user-friendly plugin with an intuitive interface.
- Support and updates: Your plugin needs to stay compatible with the latest versions of WordPress and WooCommerce.
- Speed and performance: The plugin should not slow down your website’s loading speed. Look out for optimizations like Lazy Loading.
- SEO friendly: Check that the plugin optimizes images for SEO, to ensure your product images are crawlable by search engines, potentially driving more traffic to your site.
Top 3 Plugins to Use for Product Galleries
There are a variety of photo gallery plugins available in WordPress, but ideally, you should look for one that can be used for product galleries. In order to create the best WooCommerce gallery possible, you will often need the Pro version of the plugin. Here are a few of the top options.
1. FooGallery PRO Commerce

FooGallery is one of the top WooCommerce product gallery plugins. Apart from the varied templates (including a dedicated product gallery), FooGallery also includes a range of features, from customizations to pagination and filtering, and it is built with a focus on improving gallery performance.
This plugin worked exactly as I had hoped. It is easy to use and offers a lot of out-of-the-box customization options. The support is outstanding.
Allegraportage
There are 3 paid plans, but FooGallery PRO Commerce is the one that’s needed for WooCommerce integration. This means you can sync your galleries with the WooCommerce Product Database, and select exactly which products you want to feature. You can then display products in the dedicated product gallery, or choose from any of the templates, such as the horizontal slider, playing through products on an infinite loop.
This also gives you the ability to add badges such as out-of-stock and on-sale ribbons. These can be automatically added, depending on how products are marked in the backend, though you can also add them manually. Plus you can add ‘View Product’ or ‘Add-to-Cart’ buttons, and control the behavior of the buttons.
Some of the other must-have features include:
- A built-in lightbox
- Video Integration (which is ideal for video galleries of product demos, how-tos, or testimonials)
- Advanced filtering options, and multilevel filtering
- Gallery search
- A master product feature, with File Downloads
The Best WordPress Gallery Plugin
FooGallery is an easy-to-use WordPress gallery plugin, with stunning gallery layouts and a focus on speed and SEO.
2. Envira Gallery

Envira Gallery is one of the most popular gallery plugins, ideal for both advanced and new users. Whether you’re looking to use images or videos, the versatility, user-friendliness, and customizable features distinguish this freemium plugin from its competitors.
Key features include:
- Watermark and protection
- Gallery templates
- Social media integration
- Drag & drop builder
- Mobile friendly
- Ecommerce integration
3. NextGen Gallery

NextGEN Gallery is particularly well-liked by individuals who make their income via photos, especially photographers. The free version offers two main gallery styles and two album styles but most of the special features are only available in the premium versions.
Key features include:
- Resize images
- Watermark images
- Automatic image backups and recovery
- Various gallery types
- Multiple upload options
How to Add a Product Gallery to a WooCommerce Product Page
Using a product gallery makes it easier to manage your photos. You can group and categorize your products into different galleries and use filtering within galleries to make it simpler for users to find the products they’re looking for. Features like pagination and lazy loading also make it quicker for your customers to load product galleries (which makes it easier and quicker for them to purchase).
When it comes to WordPress, the easiest way to create beautiful product galleries is to use a gallery plugin. While WordPress offers a basic gallery, you’ll want something with more advanced features for creating a product gallery. So we’re going to look at how to showcase your products using FooGallery PRO Commerce, as it comes with WooCommerce Integration.
To begin with, you’ll need to have FooGallery PRO Commerce installed on your WordPress site, along with WooCommerce. You’ll also need to have your products set up in WooCommerce – it’s a good idea to add your products to categories as you create them, as this will make it easier to build more targeted galleries.
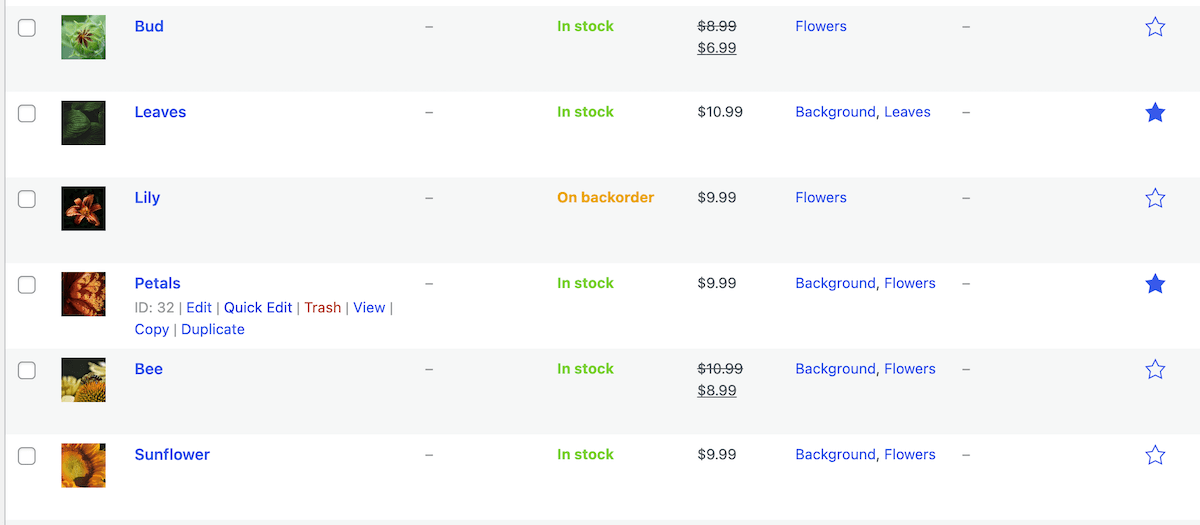
You can then follow these steps to create your product galleries:
Step 1: Add New Gallery
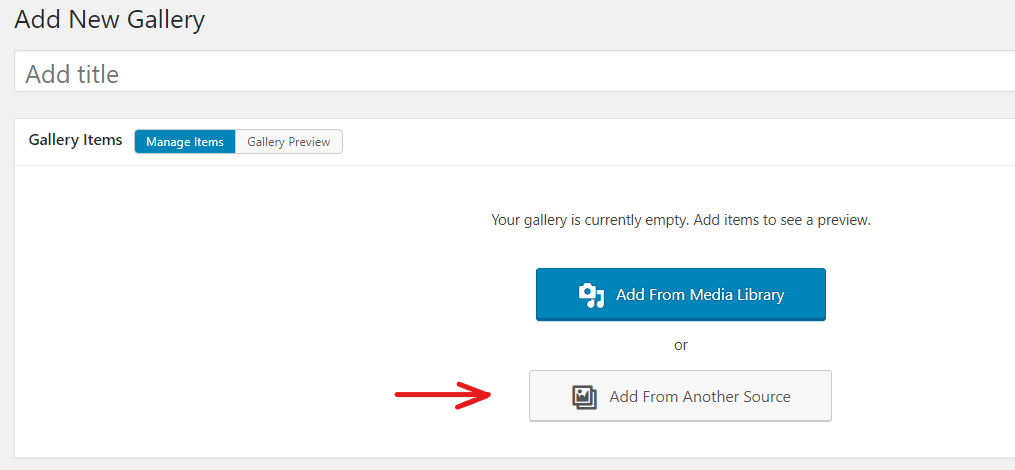
From your WordPress Dashboard, click on Add Gallery under FooGallery. A new gallery page will open, allowing you to add your products, select a gallery template, and customize the gallery (more on that in the next section).
To create a gallery with your WooCommerce Products, click on Add From Another Source.
Step 2: Add WooCommerce Products to Your Gallery
A new panel will open, where you can select WooCommerce Products as your source. FooGallery will then give you several options for selecting the products that you want to appear in your gallery. For example, you can select the specific product categories for your gallery, your price range, stock status, and so on.
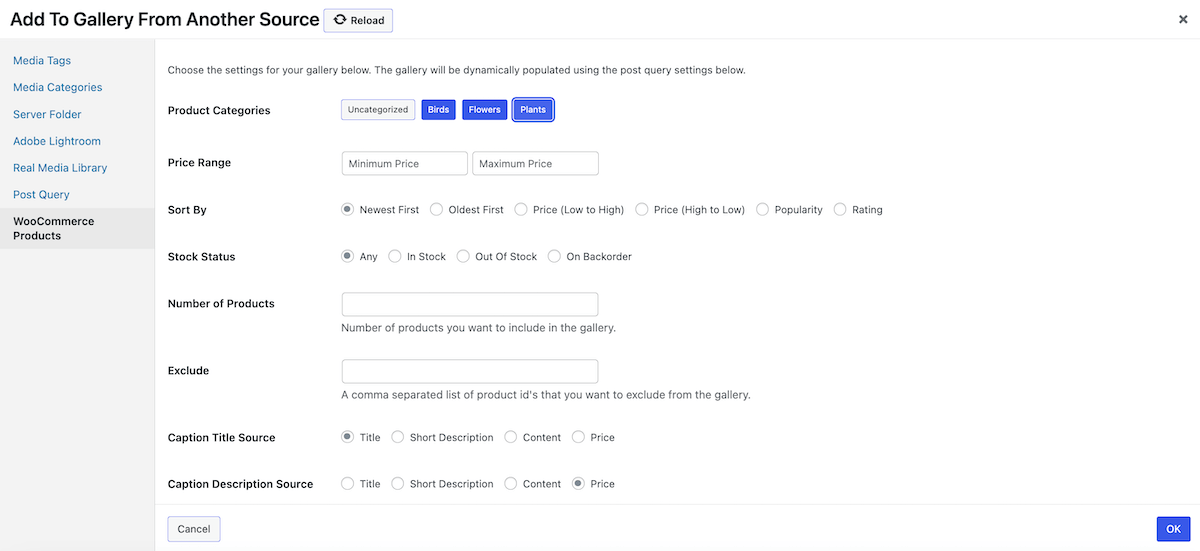
There are also several ways that you can tailor your gallery at this stage. This includes the Sort order for the gallery images, such as Newest First, or by Popularity. Your choice here will depend on your selling strategy – sorting by rating or popularity will help you sell more of your top products, which would be a good option for more exclusive stores or product lines. However, sorting by Price (Low to High) or Oldest First could help move some of your cheaper and/or older stock.
The Stock Status setting enables you to display only items in stock or include Out of Stock or Backorder items. An online store with a quick product turnaround could benefit from allowing customers to purchase items on Backorder. Likewise, showing Out of Stock labels can highlight how popular some products are. But you may want to avoid showing these items if, for example, stock is slow to arrive.
You can also set the number of products, or exclude specific products in your gallery. This is a great option for highlighting top sellers, or when displaying just a sample of your products on your homepage.
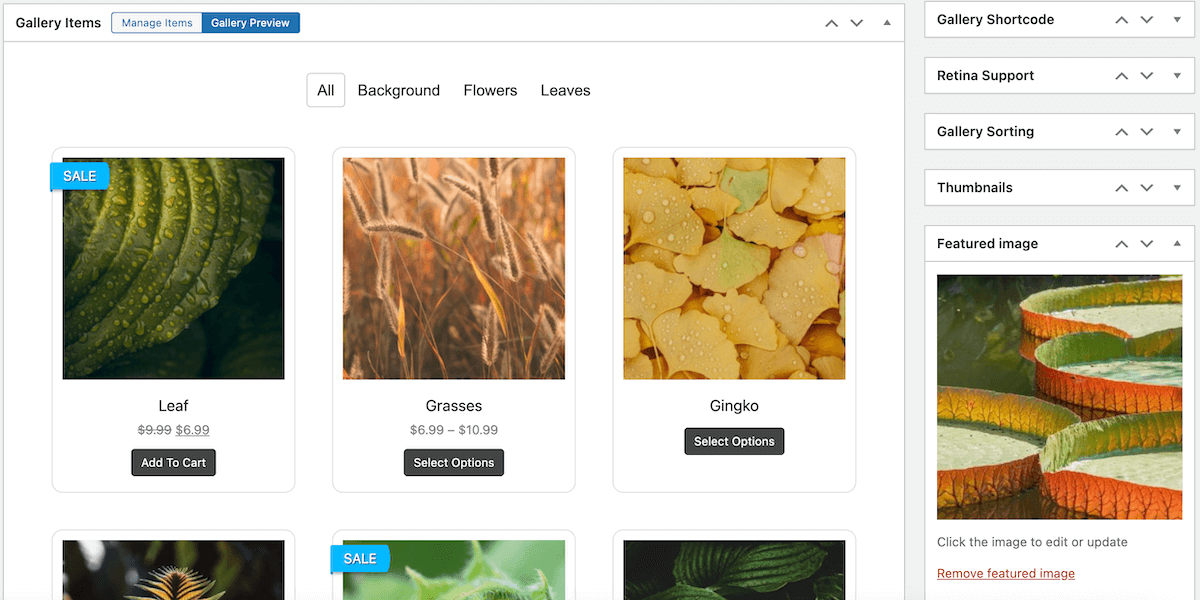
Once you have managed your selections, save these to return to your gallery (toggle over to the Preview Gallery tab to see the products now in your gallery). You can adjust these settings at any point by toggling back to the Manage Items tab and changing the settings.
Finally, you are also able to set a Featured or Main image for your gallery, which can be helpful for highlighting a specific product, especially if using the gallery in an album. To do this, find the Featured Image metabox on your gallery edit page and add your selected image from your Media Library here.
Customizing Your Galleries with FooGallery: From Tag Filtering to Unique Styling
The next step is customizing your gallery’s appearance. A good WordPress gallery plugin will give you different customization options, such as the ability to add, remove, or rearrange images, change the layout or design of the gallery, and add special effects or transitions. Essentially, you should be able to customize your gallery so that it works with your products and your online store.

FooGallery, for example, comes with various customization options, including:
- Unique styling: Different gallery layouts give you more options for styling your gallery. FooGallery PRO Commerce gives you several gallery templates, including a product gallery layout. This gives you a clean, uncluttered look, and focuses on displaying the products. But you may prefer the look of the masonry or justified gallery.
- Hover effects: Make your products stand out with different hover effects, such as scaling, hover icons, and transition animations.
- Tag filtering: Your product gallery should make it easy for customers to find what they’re looking for. With FooGallery, you can use tags or categories to filter your product.
- Custom captions: FooGallery allows you to build your own custom captions, meaning you can add product info, links, pricing, and much more into your captions.
- Video integration: Pull product videos or testimonials into your gallery – FooGallery makes this simple and allows you to add videos from various sources, such as YouTube and Vimeo.
- Pagination: Depending on the size of your gallery, using pagination may be a good idea, allowing you to split your WooCommerce product gallery into manageable pages, or by using the Load More button. This makes browsing easier and can help with page speed.
- Custom CSS: If you still need additional styling or customization options, you can use CSS to style your gallery.
With FooGallery PRO Commerce you also have the ability to add more elements to your WooCommerce product image gallery. This includes Sale Ribbons, which highlight any items on sale or promotion. Plus you can make use of Add to Cart or View Product buttons, added to the thumbnails and/or in the lightbox, giving you the best opportunity to make a sale.
The Best WordPress Gallery Plugin
FooGallery is an easy-to-use WordPress gallery plugin, with stunning gallery layouts and a focus on speed and SEO.
Now there are just a final few considerations before you publish your product gallery.
Using A Lightbox With Your Product Gallery
Ideally, you want to set your gallery to open full-size images in a popup lightbox when a customer clicks on a gallery thumbnail. This gives your customers a chance to see the product in more detail.
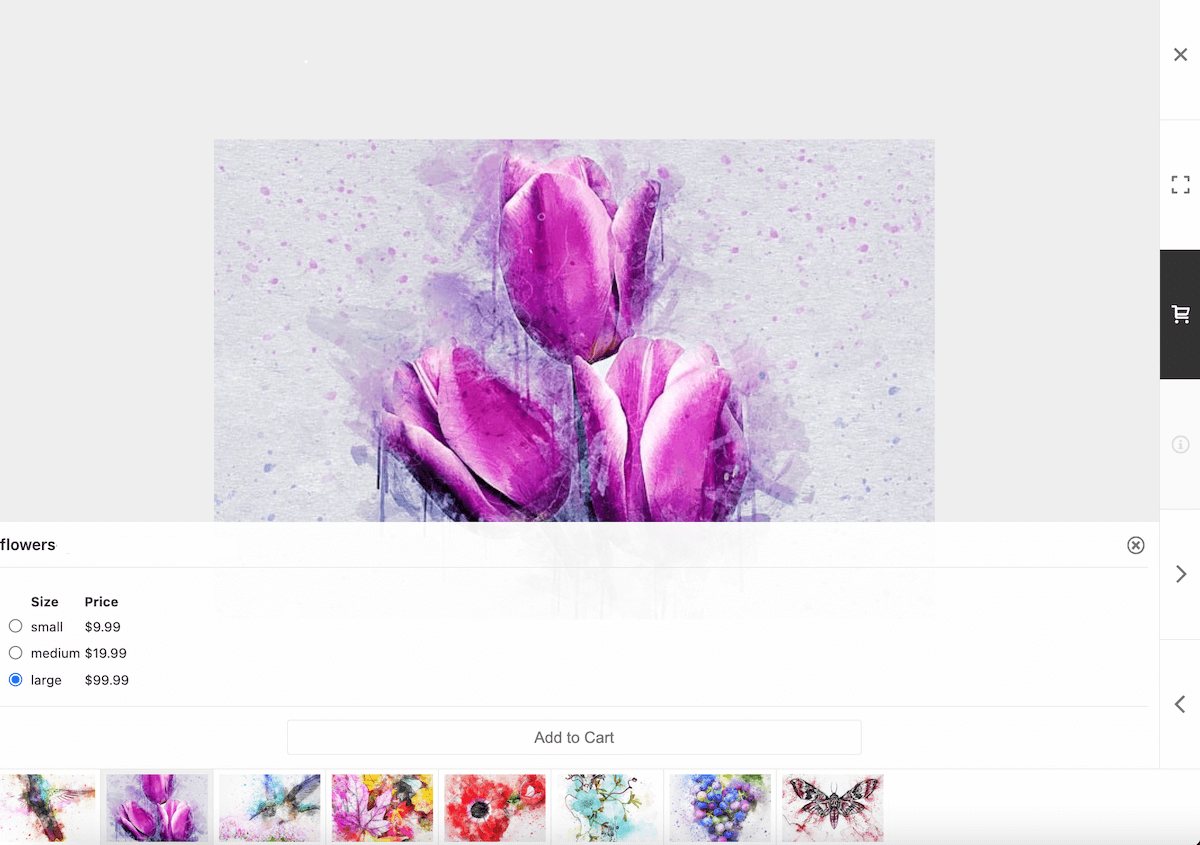
The FooGallery lightbox opens the full-size images above the gallery page, allowing customers to scroll through the product images for all of the items in the gallery. The lightbox in the product gallery will also show descriptions of each item and include an Add to Cart button. And if you have product variations (which we discuss below), these are displayed in the lightbox.
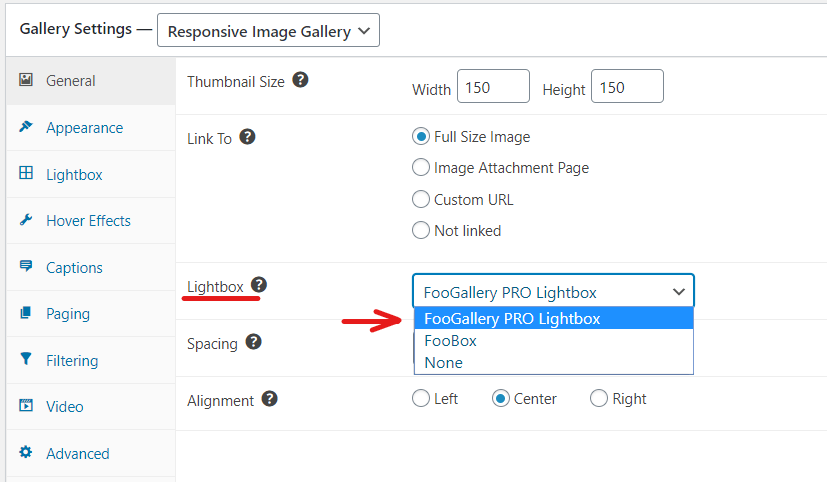
The built-in FooGallery lightbox is enabled by default. But should you need to enable it for your gallery, you can do so under the General settings. (Note that some of the templates, like the Slider or the Grid, use a panel in the gallery, rather than the lightbox).
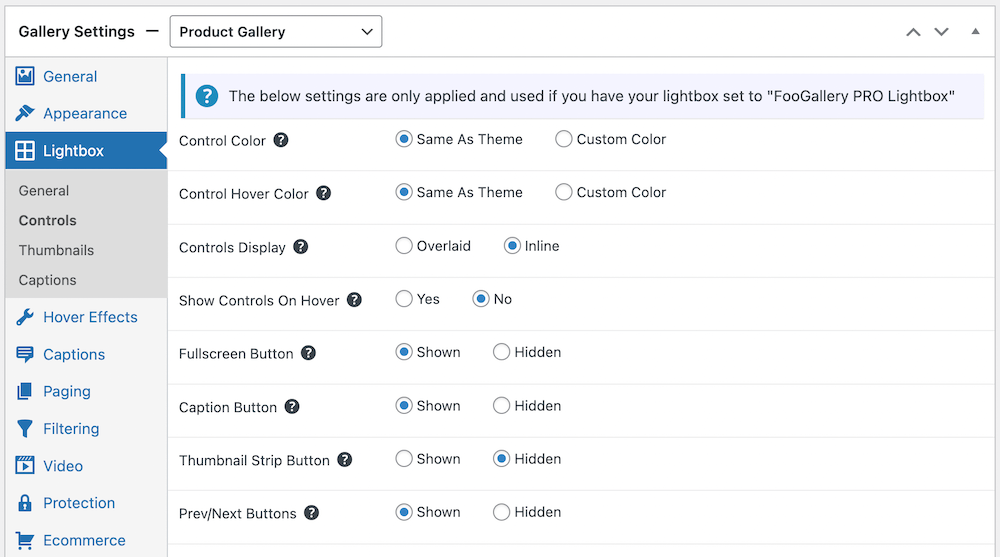
You can also customize the lightbox to match the theme and appearance of your gallery, creating a cohesive style for your online store.
Product Variations
With WooCommerce you can add product variations. This means that if you have the same shirt in four different colors, for example, or you have an image download in five different sizes, you can add these different options to a single product.
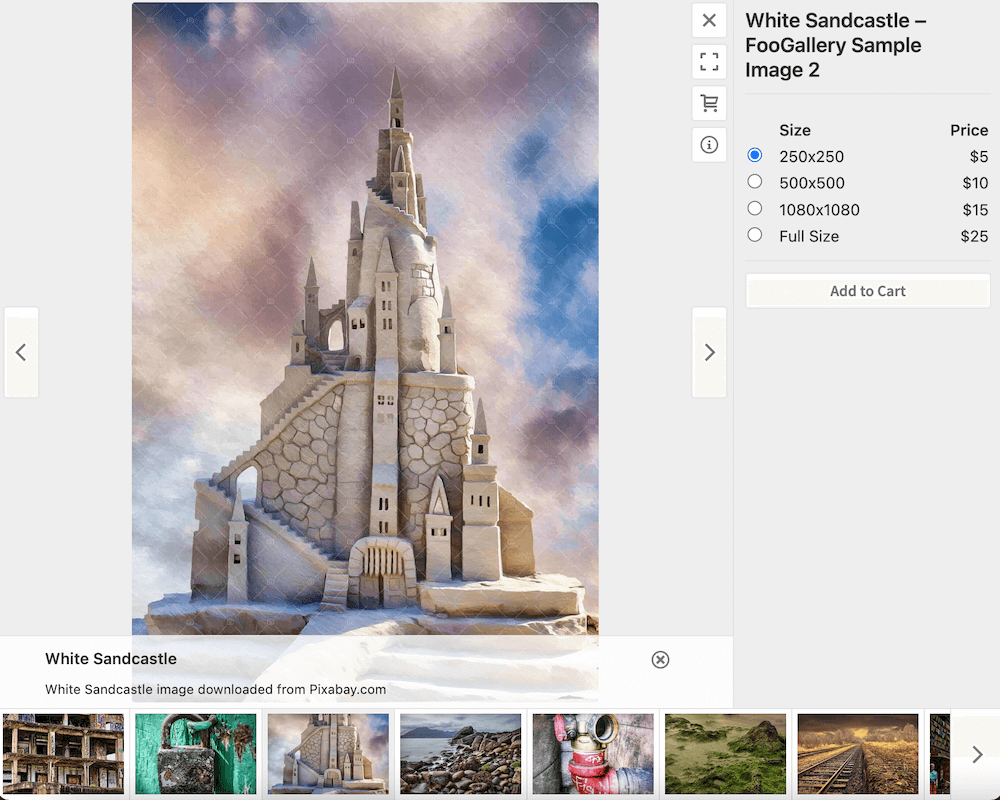
FooGallery PRO Commerce displays these variations in the lightbox. For any product with more than one option, the Add To Cart button will not display on the gallery thumbnail images – rather, customers will have to open the product in the lightbox, allowing them to choose the correct color, size, or other variation.
To do this, you can follow these steps:
- Set your product to be a variable product in WooCommerce, and then add the variations. You can add any variation for that product (for example, different sizes or colors) and then add prices for each.
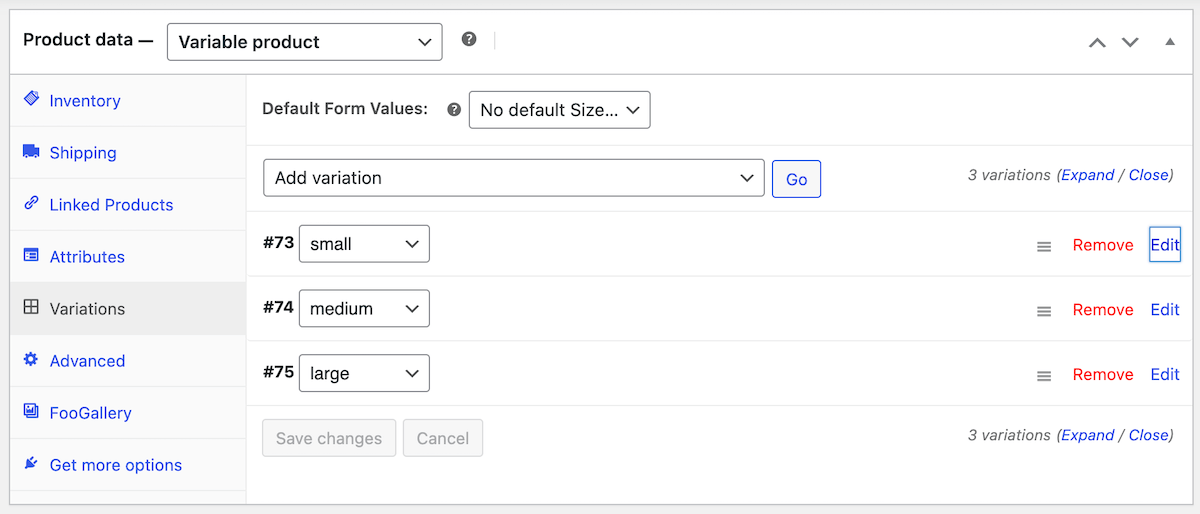
- Set up your product gallery using the WooCommerce datasource. Any products that have variations will display these in the gallery lightbox, where customers can select the size or color they want, and then add this directly to their cart.
This means that you don’t need to create separate products for each variation – which can save you a lot of time. But one of the main benefits to displaying variable products in your gallery is that customers don’t have to navigate away to a separate single product page to select the variation they want.
Single Product Gallery
A WooCommerce product gallery will typically display a selection of your products. But you may instead want to display several variation images of a single item. In this scenario, you could create a product gallery for each item and then combine your galleries into an album. In this way, you can group similar products together, while displaying multiple images for each product.
The obvious benefit here is that you can show different views or angles of your products, or even include a lifestyle photo. This will give your customers a deeper understanding and appreciation of your product, increasing the chance of them buying.
This may sound like a lot of work, but FooGallery PRO Commerce includes a handy feature to make this process much quicker: the master gallery.
I have tried several gallery plugins, and FooGallery is by far the best. I like the master gallery setting when publishing identical galleries.
Gsavary
Here’s how this works:
- Create a gallery, choosing the settings and style that you want to use for all or several of your other galleries. Now set this as your Master Gallery.

- Now when you create a new gallery, you can set it to use the Master Gallery as a template and it will inherit all of the same settings.

Then, once you have created all of your product galleries, you can simply group these into an album, giving you the ultimate WooCommerce product gallery.
Optimizing Your Gallery’s Performance
Responsiveness and Mobile User Experience
It is extremely important to have a mobile-responsive product gallery, considering the increasing number of people shopping on their mobile devices. For this, your gallery needs a responsive layout that automatically adjusts to different screen sizes for optimal viewing.
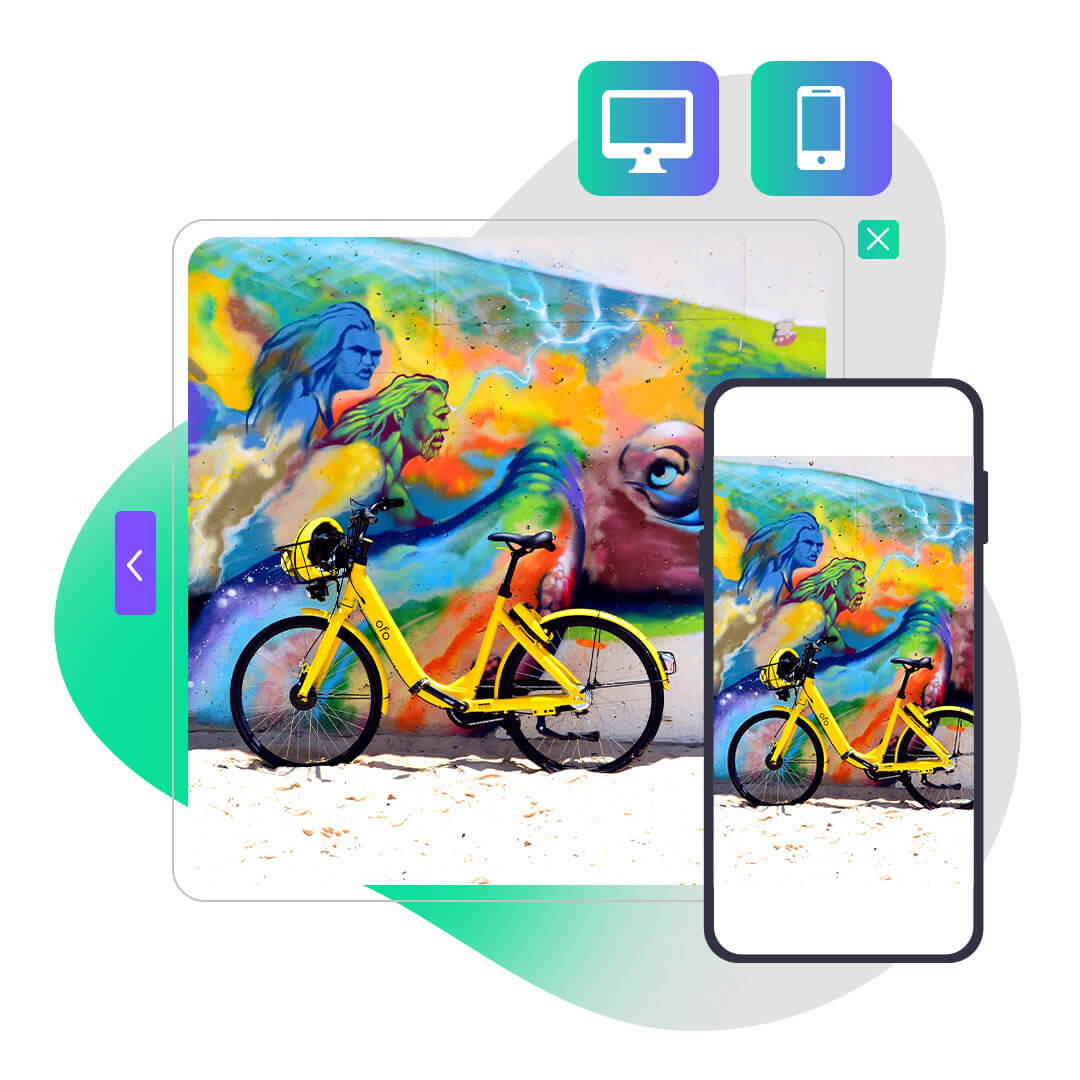
FooGallery utilizes a responsive gallery design for all of its gallery layouts, so the gallery (and the full-size image when opened in the lightbox) respond to the screen size from which it’s being viewed. This ensures that your product galleries are mobile-friendly.
Having a mobile-friendly, or responsive design, makes it easier for customers to view products and shop, regardless of the device they’re using. But it’s also beneficial for SEO – search engines prefer to rank websites that are mobile-friendly.
Optimizing Product Images for SEO and User Experience
Another important consideration when setting up image galleries is optimizing product images. Again, this is essential for both SEO and user experience; it can improve website loading speed, which has a positive impact on search engine rankings and generally improves customer satisfaction.
You can optimize product images, either before you upload them with photo editing software, or by using an image optimization plugin. Other optimization recommendations include:
- Using high-quality images, but compressing them without losing quality (such as by using lossless compression)
- Adding alt text and captions
- Choosing the right file format
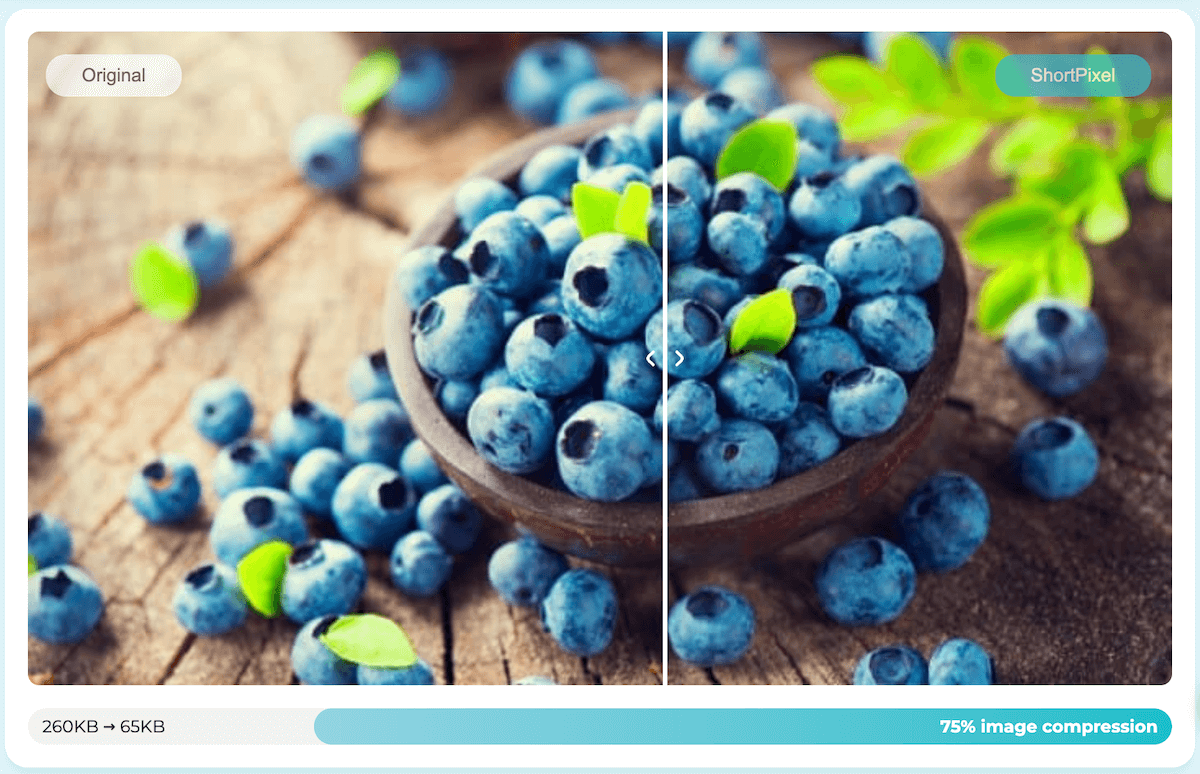
Here’s a look at an image compressed on Shortpixel – there’s a 75% compression for a much-reduced file size, without significant loss of quality.
Testing Your WooCommerce Product Gallery with FooGallery
Finally, test your product gallery before launching, to ensure it works correctly and provides a good user experience. A quick, responsive gallery with good-quality images can help with user engagement, and the easier it is to purchase from your gallery, the higher the chance of conversion. Conversely, galleries that are sluggish, with too many steps in the buying process are more likely to deter potential customers.
Here are a few things to look for during testing:
- Loading speed: Use a tool like PageSpeed Insights to test the speed of your gallery page. It should load as quickly as possible, but longer than 3 seconds and you could start losing customers.
- Image quality: Images should be clear and of a good-enough quality to showcase your products. But at the same time, avoid very large images that are likely to slow down your site.
- Mobile responsiveness: As we discussed earlier, a responsive design is vital, so ensure the tools you are using are mobile-friendly.
And remember, FooGallery users who need help with implementation and testing can make use of our documentation (there’s loads of info and recommendations available for our free and Pro plugins). If you can’t find the answer you’re looking for, you can always contact us.
The Best WordPress Gallery Plugin
FooGallery is an easy-to-use WordPress gallery plugin, with stunning gallery layouts and a focus on speed and SEO.
Maximizing Your WooCommerce Product Gallery Potential
There are clear benefits to using a product gallery in your ecommerce store. It’s an ideal way to showcase your products while streamlining how your customers shop and, ultimately, purchase your products.
For this, we recommend using FooGallery PRO Commerce for your WooCommerce product galleries. From its variety of templates and customization options to its advanced features like video integration and SEO-friendliness, FooGallery ticks all of the boxes. Plus, it comes with the all-important WooCommerce integration that makes setting up product galleries so much simpler.
Why not try FooGallery for yourself, and see the difference it can make in your online store?
