Custom filters are essential for creating a better user experience on WordPress websites. Whether you’re running an online store with WooCommerce, showcasing a photography portfolio, or managing a content-heavy blog, filters help visitors find exactly what they’re looking for.

You can implement WordPress custom filters in various ways:
- On blog pages to organize content by topic, date, or author.
- On product pages to help customers sort by price, color, size, or other attributes.
- In image galleries and portfolio showcases to categorize work by style or type.
While it’s possible to add custom filters using code, this approach can be challenging for those without deep technical knowledge. That’s why many WordPress site owners opt for dedicated plugins like FooGallery that offer pre-built filtering solutions.
In this guide, we’ll explore both methods – adding filters with code and using a plugin if you’d rather skip coding – while also covering best practices to help you make the right choice.
How to Add Custom Filters in WordPress With Code
Customizing WordPress filtering functionality requires understanding a few key concepts and functions. Let’s break down the essential components and how to implement them.
Understanding Hooks and Their Importance
In WordPress, hooks are essential tools that let you modify how WordPress works without changing its core files. Think of hooks as specific points where you can add or modify functionality. There are two main types:
- Action Hooks: These let you add new functionality at specific points.
- Filter Hooks: These allow you to modify data before it’s displayed or processed.
For custom filters, we’ll focus on filter hooks, which are the foundation for creating customized filtering systems in WordPress.
Using the add_filter() Function to Create Custom Filters
The add_filter() function is the primary tool for implementing filter hooks in WordPress. This built-in function connects your custom filtering code to specific points in WordPress’s processing sequence, determining when and how your modifications are applied.
How to Modify Your Search Results Using Code
If you need to customize how your content appears in search results, you can add a simple code snippet to your WordPress theme. For example, you might want to exclude certain categories from your search results. Here’s how to do it:
- Step 1 – Create Your Custom Function
Copy this code, replacing ’10’ with the ID of the category you want to exclude:
function exclude_category( $query ) {
    if ( $query->is_search && !is_admin() ) {
      $query->set( 'cat', '-10' ); // Exclude category 10
    }
    return $query;
}Code language: PHP (php)- Step 2 – Add Filter Hook:
Add this line after your function:
add_filter( 'pre_get_posts', 'exclude_category' );Code language: JavaScript (javascript)- Step 3 – Add This Code to Your Theme:
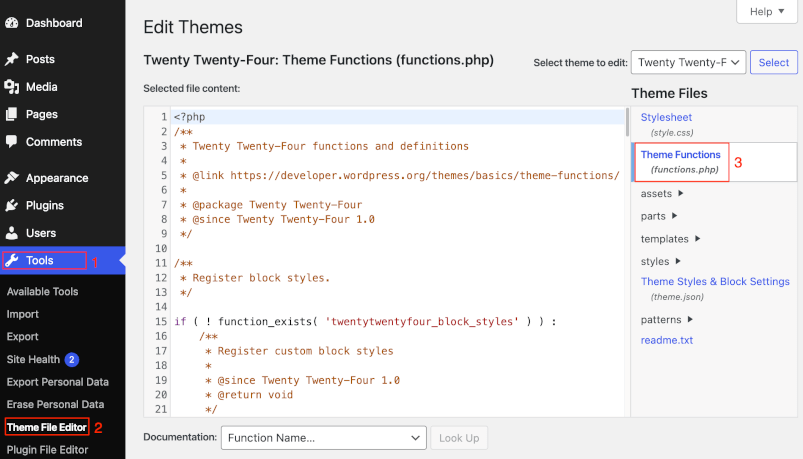
You can add the code to your theme’s functions.php file. This is a special file that WordPress recognizes for custom code:
- Go to Tools > Theme Editor in WordPress admin.
- Find functions.php in the right panel.
- Paste both code snippets at the end of the file.
Important: Before making any changes to your theme files, always create a backup first.
Limitations and Challenges of Customizing WordPress Filters With Code
While powerful, custom filters come with specific complexities:
- Technical Skills Requirement: A solid understanding of HTML, PHP, WordPress core functions, and overall WordPress architecture is needed. Otherwise, the range of custom filters you will be able to create will be very limited.
- Maintenance and Updates: There is also a need for ongoing maintenance, as well as continuous updates when filters are coded manually. If not, you could face performance issues due to heavy database queries.
- Complexity and Time Consumption: It can be difficult to maintain clean and optimized code for large-scale WordPress sites. Creating custom filters can add to the complexity, not to mention the time it requires.
- Compatibility Issues: You are potentially putting your website at risk of code conflicts in case of theme or plugin updates.
Why a Plugin is a Better Solution for Custom WordPress Filters
While custom coding offers flexibility, WordPress plugins provide several advantages for implementing custom filters:
- No-Code Solution: Plugins like FooGallery offer pre-built custom filters without requiring coding knowledge.
- Enhanced User Experience: Quality plugins include optimized features like lazy loading, animated transitions, and intuitive filter buttons.
- Maintenance and Compatibility: Well-maintained plugins offer automatic updates, security patches, and consistent performance across different WordPress setups.
Steve Usher, lead developer at FooPlugins, explains:
For non-technical users, the prospect of coding custom filters can be daunting, not to mention the potential costs associated with hiring a WordPress developer to implement such functionalities. Plugins offer a cost-effective and accessible solution, providing pre-coded functionality that streamlines the process and eliminates the need for intricate coding knowledge.
Creating Galleries With Custom Filtering With FooGallery
FooGallery PRO Expert enables powerful custom filtering for WordPress galleries, making media content organization intuitive for both administrators and visitors.
Key features include:
- Multi-Level Filtering Function: This function allows you to create multi-level filtering for galleries. For example, the first level could be general themes like “Animals” or “Landscapes”. The second level for the “Animals” filter could be “Cats,” “Dogs,” “Birds,” and so on. This functionality becomes especially useful as the galleries grow, and it gets harder to categorize them.
- Tag Filtering Function: FooGallery allows website owners to tag their posts in the backend so their visitors can filter them by those tags in the frontend.
Watch our video tutorial for a quick overview, or follow the steps below to easily implement your filters:
How to Set Custom Tag Filtering With FooGallery PRO Expert
To create your filters, you first need to set up custom tags or categories (you can use either to create your filters). This is simple with FooGallery PRO Expert, which includes the tag and category field for images by default. There are several ways you can then add your tags:
- WordPress Media Library: In the media library, select the image to which you want to add tags and scroll down to the tags / categories field. Add the tags you wish to use. You can also do this when you upload an image to your library. However, this can be a lengthy, manual process.

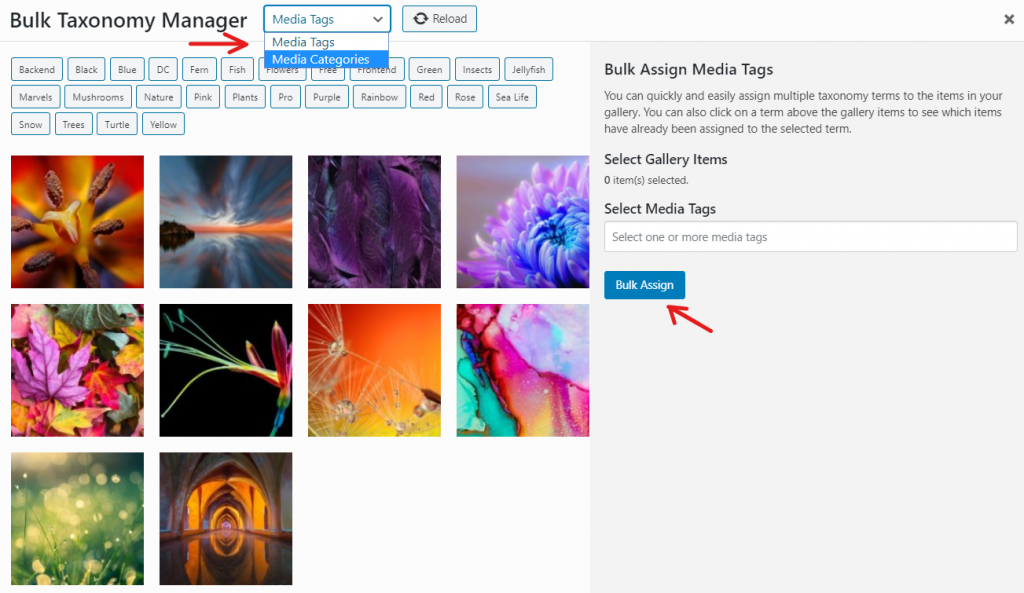
- Bulk Taxonomy Manager: Efficiently tag multiple images at once. You can access this feature from the Manage Items panel of your gallery.
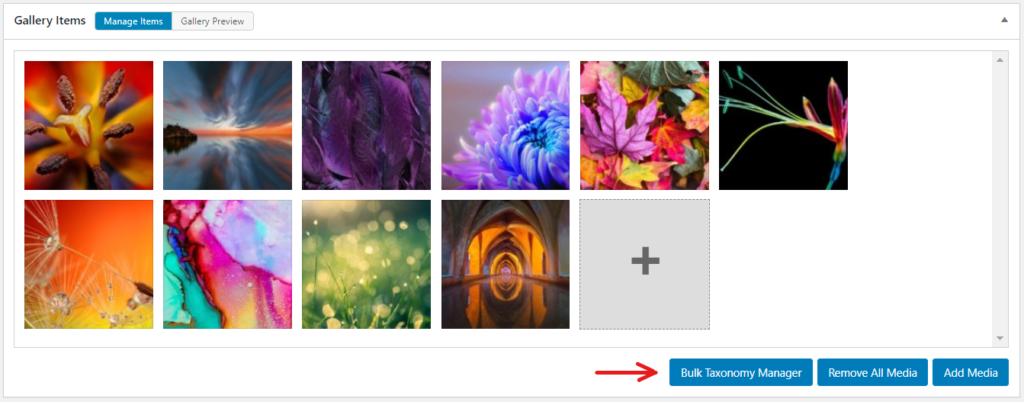
Once you click on this button, another screen will open, displaying the images in the gallery on which you are working. You’ll also see all of the tags assigned to images on your site, as well as a panel where you can add tags. At the top of this panel, you’ll have the option to switch between tags and categories.
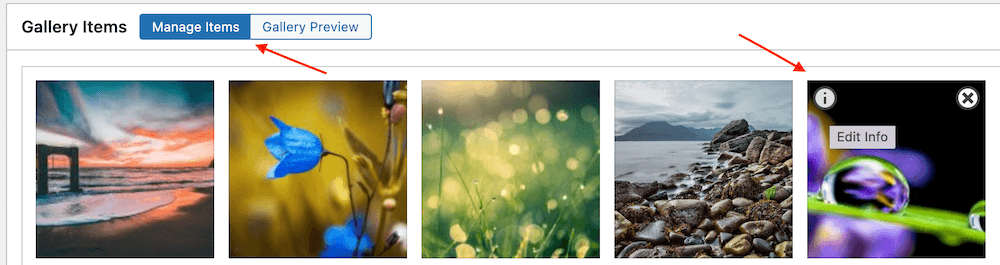
- Attachment Modal in FooGallery: Edit tags without leaving your gallery page.
Once enabled in your settings, to access it, click on an existing gallery, or add a new one. In the Manage Items tab of your gallery, you will see a small ‘i’ in the upper left corner of your images, when you hover them. Click on this (on any one of the images) and the modal will open up in a panel above your screen.
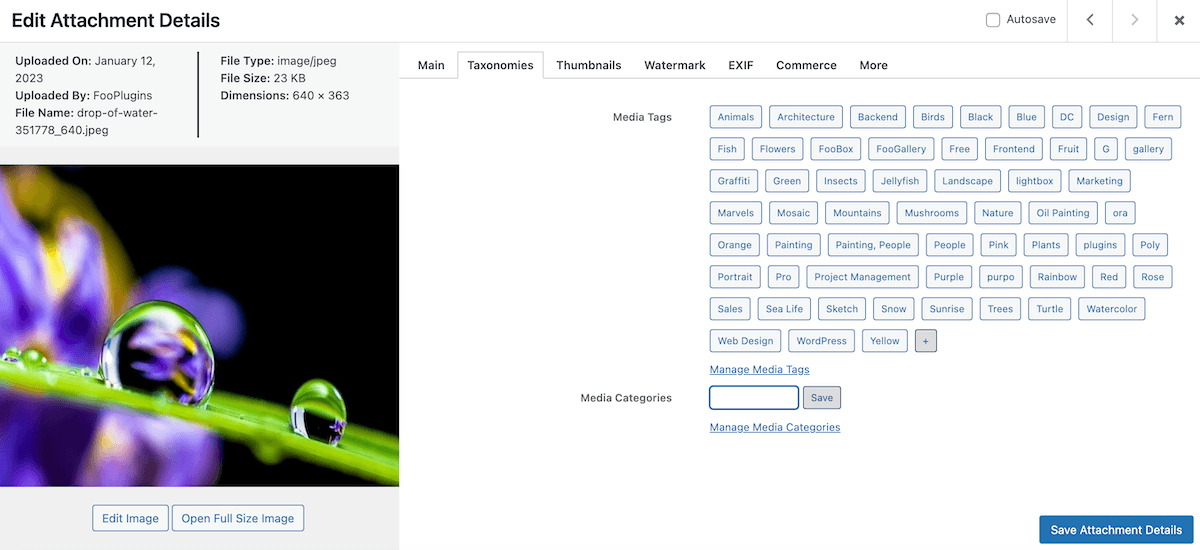
Then you can manage your tags and categories in the Taxonomies tab.
To set up filtering for your gallery:
- Navigate to the Filtering tab in your gallery settings
- Choose your filtering type:
- Simple: Basic tag/category filters, with theme and customization options.
- Advanced: Enhanced customization features with multiple selection options, including: displaying image counts per tag, adjusting button appearance based on image quantity, and setting minimum image thresholds for filter visibility.
- Multi-Level Filtering: Hierarchical organization for complex galleries improving both user experience and page speed.
How to Set Multi-level Filtering With FooGallery PRO Expert
With this feature, you can set numerous levels of filters, each level filtering down the selection further. For extensive galleries, this can improve both user experience and page speed.
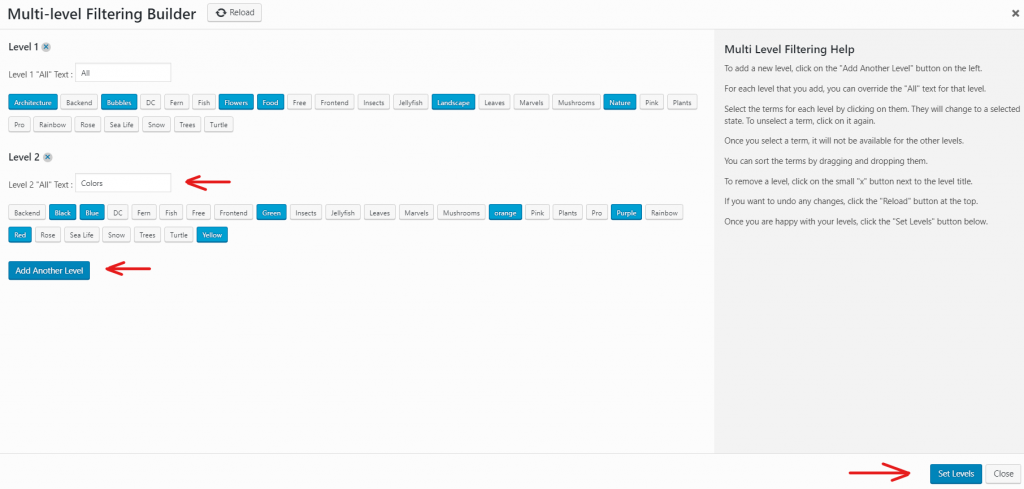
To set this up in FooGallery PRO Expert, sSelect Multi-level in the Filtering tab of your gallery settings. Again, you can choose the filter source, theme, and position, along with the selection mode. You’ll then be directed to select your levels.
Selecting this will open a panel where you will be able to choose the tags that you want to display at each level. Using the “Books” example, your first level could be “Fiction” and “Non-Fiction.” From there, Fiction might break down into “Mystery,” “Fantasy,” “Science Fiction,” and “Romance,” while Non-Fiction could include “Biography,” “Self-Help,” “History,” and “Science.” The options are many and varied.
Once you’ve set your filters, you can return to the gallery settings to preview them. To edit or change any of the filters you can click on Select Filters in the settings and make the necessary changes.
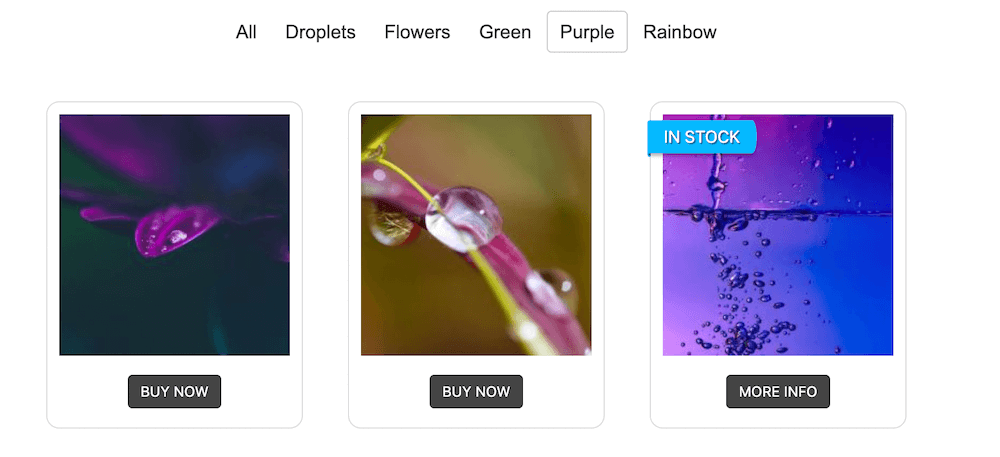
Here’s a look at how this works on the frontend:


Best Practices for Optimizing Custom Filters
Optimize Database Performance and Query Speed
Efficient database organization is crucial for delivering fast-filtered results to your visitors. The most basic step is to use a caching plugin like WP Rocket or W3 Total Cache. These plugins help store frequently accessed information where it can be retrieved quickly, similar to keeping popular books on an easily accessible shelf.
Tip
Pro Tip
Pro Tip
Focus on your most-used filter combinations. For example, if visitors often filter your product gallery by both “size” and “color,” save these filtered results temporarily (called caching). This way, when the next visitor uses the same filters, the results load instantly. Just remember to refresh these saved results every 24 hours or whenever you update your products.
Implement SEO Optimization for Filter Architecture
While general gallery SEO practices are covered in depth in our complete guide to image gallery SEO, filtered galleries require additional optimization considerations. Popular plugins like PermalinkManager.pro can help you start by creating clean, descriptive URLs that reflect your filter hierarchy (example: /products/mens/shoes/running instead of /products?cat=1&type=2). For WordPress sites using custom taxonomies, implement proper canonical tags to prevent duplicate content issues when multiple filters are applied.
Key Strategy: Use rel=”next” and rel=”prev” tags for paginated filter results, and implement dynamic XML sitemaps that include your primary filter combinations while excluding less valuable filter permutations.
Plugins like Yoast SEO or All In One SEO (AIOSEO), compatible with FooGallery, can automate these SEO optimizations for you.
Build User-Friendly Filtering Interfaces
User experience makes or breaks filter functionality. Position your filters where users expect them – typically on the left side for desktop views and as an expandable menu for mobile. Show users their current active filters and provide a clear way to remove them individually or reset them all at once.
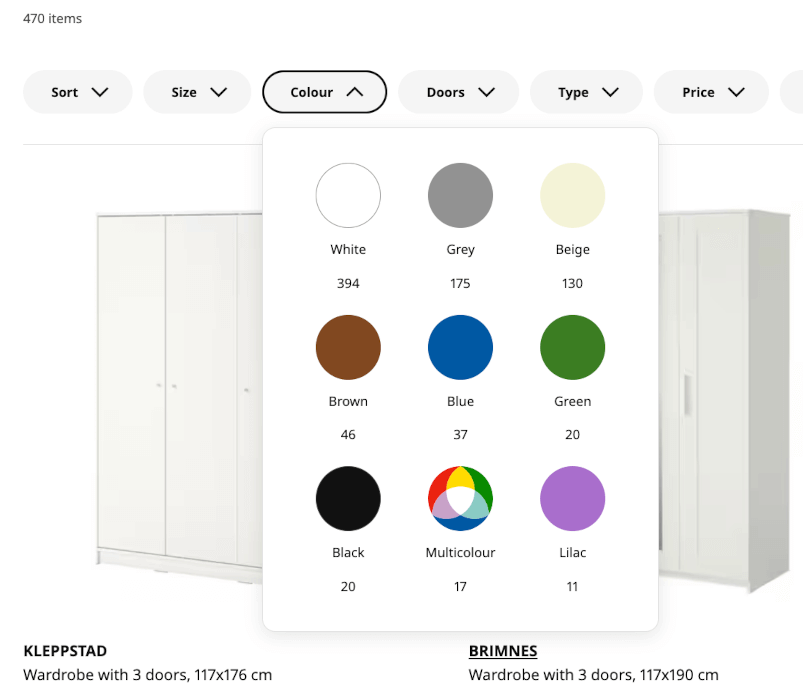
As an example, when implementing multi-select filters, show instant feedback like “10 products match these criteria” before users commit to their selection. IKEA‘s website demonstrates this effectively. In their bedroom section, when browsing wardrobes and selecting color filters the interface instantly shows directly under “White” “394” before you apply the filters. This helps users make informed decisions without frustrating page reloads.
Implementing all these best practices through specialized plugins saves you from complex coding while ensuring proper functionality. Well-maintained plugins automatically handle updates and technical requirements, making it the most practical choice for most WordPress users.
Enhance Your WordPress Galleries Today With FooGallery Filters
Utilizing FooGallery for custom filters includes a number of key benefits, including ease of use and advanced features tailored to various user needs.
Unlike complex coding requirements and limited default options available in WordPress, FooGallery provides a simpler solution. In FooGallery, custom filters are easy to set up, you don’t need to be (or hire) a developer and you don’t need to worry about plugin, theme, or core updates playing havoc with your code. The result is an easier, faster way to add filters, that can then boost performance and improve navigation and user experience.
If you want a hassle-free way to add custom filters to your WordPress site, try FooGallery PRO Expert for yourself.