What is FooGallery?
FooGallery is the Most Intuitive and Extensible Gallery Creation and Management Tool Ever Created for WordPress; built to be simple for users and highly flexible for developers.
FooGallery is a WordPress Gallery Plugin that allows you to easily create beautiful photo galleries. The plugin provides for an intuitive gallery creation and management experience with the added benefit of the powerful features that FooGalley includes.
Getting Started
The first step in installing the FooGallery plugin. If you haven’t already done so, you can go here to find out how to install it.
Once installed, it’s time to create a new FooGallery. To start, navigate to FooGallery–>Add Gallery from your dashboard. Start by giving your gallery a title.
Adding Gallery Items
Click the Add Media icon to start adding images to your gallery. This will bring up a panel giving you WordPress Media Library and Upload Files options. (The Import Videos option you see below comes with FooGallery PRO).
To Upload Files, click on the far left tab and then select your files. Once you’ve uploaded your files, choose the images you would like to include from your Media Library and click the Add Media button on the lower right. This will insert your selected images into your new FooGallery.
FooGallery Settings
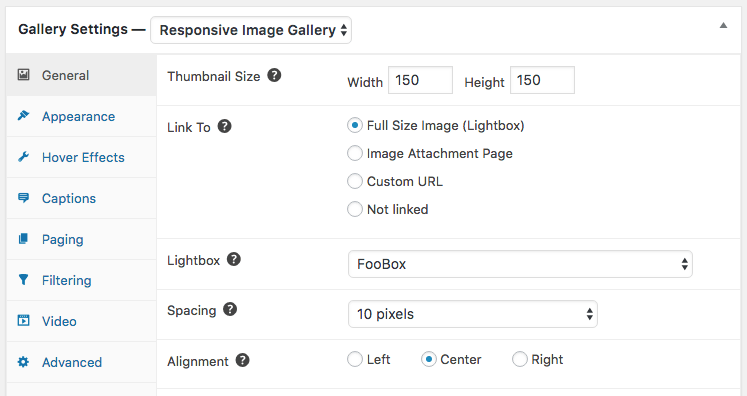
Below the Gallery edit screen, you’ll see the Gallery Settings area.
As you adjust your settings, you can see how the gallery will appear on the frontend by clicking on Gallery Preview in the Gallery Items area.
The settings will vary depending on the Gallery Template you select, but below we’ve covered the basic settings for the Responsive Image Gallery. For more info on our other gallery templates and settings, check out our documentation.
Gallery Template
You can choose the gallery template will be applied to you gallery on the frontend of your site.
There are several built-in templates available with FooGallery Free. PRO templates, however, are only available for FooGallery PRO users.
General Settings
The default settings will be applied, or you can adjust each of the settings for your gallery.
To begin with, you can change the size of the thumbnails in your gallery. The default size is set to the built-in WordPress image sizes as you have them in Dashboard–>Settings–>Media and/or any custom sizes defined by your theme or other plugins.
In the Link To section, you can choose to link your thumbnails to their full size image, to the Image Attachment Page or to a Custom URL. In most cases, we recommend linking to the full size image to enable lightbox plugins like FooBox to work properly.
If you have a supported lightbox plugin activated, you can choose to apply it to your gallery in the Lightbox field. Alternatively, if you’re using FooGallery PRO, you can use the built-in FooGallery PRO Lightbox.
Thumbnail Spacing allows you to choose the spacing you would like inbetween each thumbnail image in your gallery.
In Alignment, choose how you would like your gallery aligned horizontally within your post or page.
Appearance
You can alter the appearance of your gallery thumbnails in this tab.
You can adjust the border of your thumbnails by changing the Theme, Border Size, Corners, and Drop and Inner Shadows.
The Loading Icon displays as images are loading and the Loaded Effect is used once images have loaded. The Fade In loaded effect is available in FooGallery Free, while FooGallery PRO users can choose from several other options.
Hover Effects
In the hover effects you can alter the effects that display when you hover over the thumbnail in the gallery.
The hover effect can include color and scaling effects. You can also change the caption to be visible on hover, or always visible. The transition effect is how the hover effect is displayed and you are able to select the icon that displays. You’re also able to invert the hover effects by selecting Inverted Colors.
FooGallery PRO also comes with a selection of presets, along with the other settings.
Captions
The Captions settings adjust which captions display on your thumbnails.
You can leave it set to default or choose to include the title, caption, alt tag or description as the title or description for the image. These pull from the media file, and can be adjusted by editing the individual image or file.
Paging
The default setting here is None, so to add Paging to your gallery you will need to select a Paging type. FooGallery Free comes with Dots. Once you’ve selected this you’ll be able to set your Page Size, as well as the position and theme of the Dots.
FooGallery PRO comes with the additional numerical Pagination, Infinite Scroll and Load more.
FooGallery PRO
Filtering
FooGallery PRO includes Filtering, which allows you to include gallery filtering for Media tags and categories.
You can select the Simple Filtering for basic options such as Theme, Source and Position. Alternatively, Advanced Filtering gives you more options, such as changing the size or opacity of the Filter buttons.
Video
FooGallery PRO also includes video, allowing you to create WordPress video galleries or to add videos and images to the same gallery.
In this tab, you’re able to choose the icon you would like to display on your video thumbnail. You can also make it Sticky, meaning it displays even when you’re not hovering over it. You can adjust the size of your lightbox, should you need to. And finally, you can set YouTube and Vimeo videos to play automatically.
Gallery Featured Image
You can set a Featured Image per gallery. This image will show in your gallery listings and can also be used in your own custom gallery templates.
The image you use as your Featured Image does not have to exist in the gallery itself (but it could).
Gallery Usage
This box will show you a list of pages or posts where the current gallery is being used. It’s a great time saver when you’re managing your previously created galleries.
If your gallery has not yet been inserted into a page, you can quickly create a new gallery page to use for your gallery.
Adding FooGallery to Posts and Pages
If you’re using the Gutenberg editor, it is simple to add a gallery to your posts or pages. Here’s a quick look at how to do this:
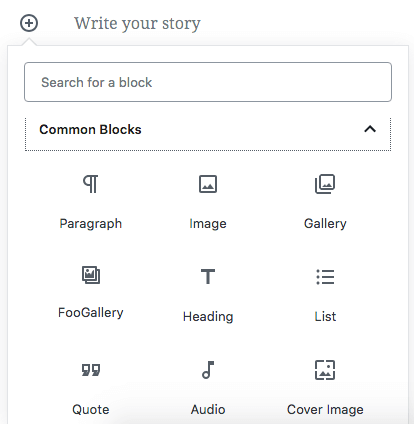
Step 1: Click on the + button in the editor, from where you can select the block you want to include. The FooGallery block can be found in the Common Blocks. Click on it.
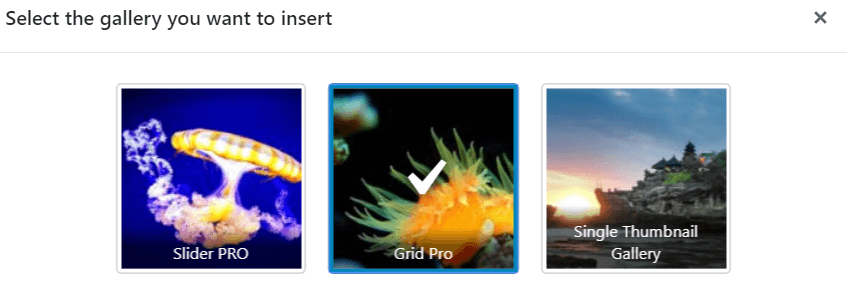
Step 2: You’ll now see a FooGallery block with a button allowing you to Select Gallery. Click on this and a panel will open, showing you all of your current galleries. Click on the gallery you want to use.
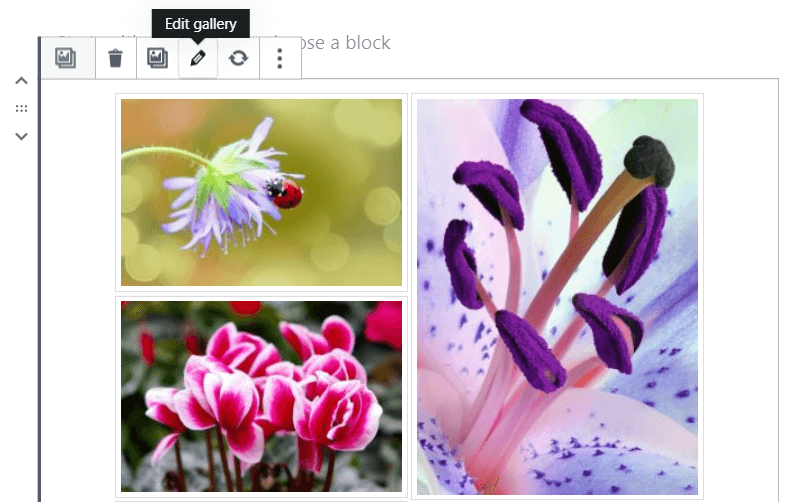
Step 3: You’ll be given a preview of your gallery, in your page or post. From here you can click on the edit button, which will open your gallery in a new tab, allowing you to make the necessary changes. Once you’re done, simply update the gallery and refresh the FooGallery block.
Gallery Shortcode
A shortcode is automatically generated for each gallery. This can be pasted into any page or post to display your gallery, which is useful if you’re using the classic WordPress editor.
Click the shortcode in this box to automatically copy it to your clipboard for easy pasting elsewhere.
Viewing and Editing FooGallery
You can view and edit any of the FooGalleries you’ve created. Navigate to FooGallery–>Galleries from your dashboard and you will see all the galleries you’ve previously created.
Just like Pages and Posts, you can edit any FooGallery by clicking the edit button (which appears on hover) under the gallery name.
You can also go into Edit mode on any gallery from within a Page or Post by clicking the Edit icon for the gallery.
FooGallery Support
Support for FooGallery is provided via the WordPress.org forums or the FooPlugins Support page.
If you experience bugs or have specific feature requests, please open a ticket with Support.


Comments are closed.