Confused by WordPress image sizes? Not for long! In this comprehensive post, we explain everything you need to know.
It’s extremely important to have effectively optimized images on your website. Whether you run a blog, sell photography, or own an ecommerce site, you’ll want all of your images to look great and load quickly, both for SEO purposes and for a good user experience.
It’s critical that you display, compress, and optimize your original images correctly, and follow best practices for using images on your website – but you may not be quite sure how.
Today, we’re going to answer some of the most frequently asked questions about WordPress image sizes.
What are the Default WordPress Image Sizes?
WordPress automatically generates several image sizes when you upload a photo. Here are the four default sizes WordPress creates:
- Thumbnail (150 x 150 pixels): Ideal for small thumbnails in galleries, blog previews, and widgets
- Medium (300 x 300 pixels max): Perfect for in-content images and smaller displays
- Large (1024 x 1024 pixels max): Suitable for full-width content areas and detailed views
- Full Size: The original dimensions of your uploaded image
Whenever you upload a photo or other image to your site, WordPress will automatically generate these different versions depending on the context.
WordPress determines an image’s size based on its intended use. For example, the thumbnail size will be automatically selected for images in a blog feed, while the large size will be automatically selected for a blog post header image.
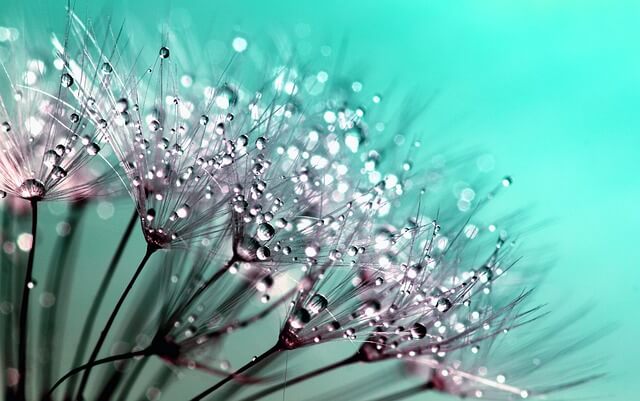
Here’s how a medium-sized image would look:
Why are These Sizes Important?
These default sizes directly impact your site’s speed and performance:
- Each size serves a specific purpose, ensuring images look crisp whether they’re tiny thumbnails or full-width headers. Using the right size prevents pixelation and maintains visual quality across your site.
- Serving appropriately sized images drastically improves page load times. Loading a 150 x 150 thumbnail instead of a 3000 x 3000 original saves bandwidth and speeds up your site.
- Multiple image sizes enable WordPress to serve the most appropriate version based on the viewer’s device. Mobile users get smaller files for faster loading, while desktop users see higher quality images, ensuring responsiveness no matter which device you’re on.
How Do I Set New Default Image Dimensions in WordPress?
You can set alternative image dimensions for your default image sizes in WordPress via your Settings:
- Navigate to Settings > Media in your WordPress dashboard.
- Under Image Sizes, enter your desired dimensions in the Width and Height fields. You can set the Thumbnail size, medium size, and large size dimensions.
- Once you’re happy with the new image sizes, select Save Changes.
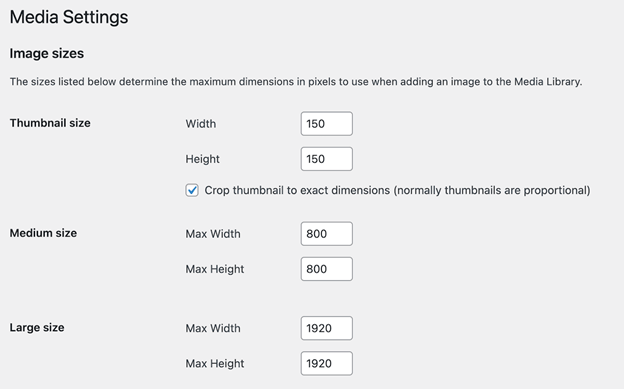
Every time you select Thumbnail, Medium, or Large for your image, WordPress will display it in the dimensions you’ve just set.
How Do I Add Additional Image Size Options in WordPress?
If you need more than four default image sizes and your WordPress theme doesn’t already offer this, you can create new custom image sizes using a free plugin like Image Regenerate & Select Crop:
- Download and install the Image Regenerate & Select Crop plugin.
- Navigate to Image Regenerate & Select Crop in your WordPress dashboard.
- Select Additional Sizes.
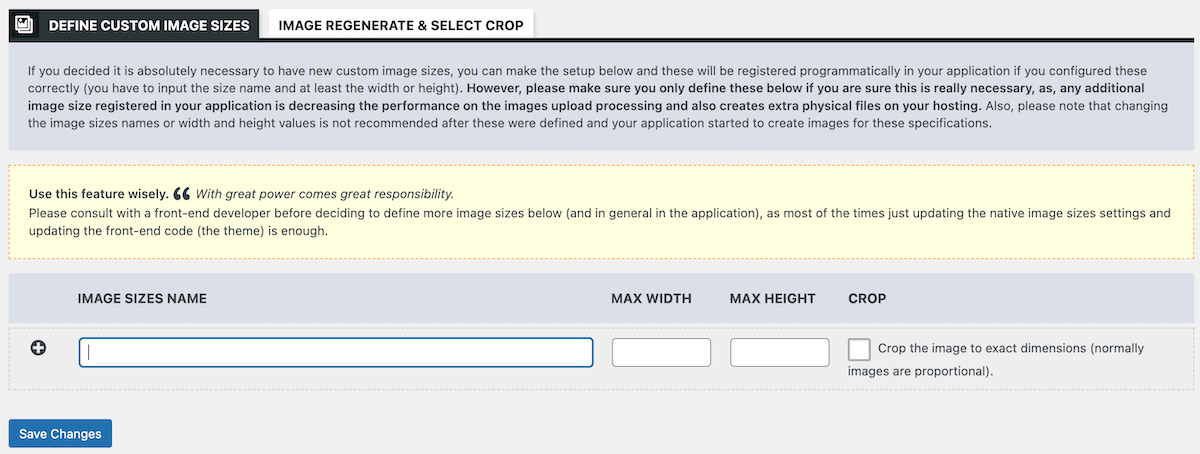
- Enter a name for your new custom image size.
- Set your desired dimensions in the Max Width and Max Height fields.
- Select Save Changes.
Note that this does come with a warning, saying that adding an additional size could impact performance. They also advise consulting with a developer before doing this.
What Size Should My Images Be for WordPress?

WordPress will automatically size your images for you but, if you’re so inclined, you might want to make sure your images are uploaded at a size that prevents them from getting stretched, blurred, or cropped.
The best image sizes will depend on various factors including how you want to use different images, whether they will be shared on social media, or, as mentioned, the WordPress theme you use. However, WordPress.com provides a few recommendations for different image sizes:
| Image Type | Recommended Size | Usage Tips |
|---|---|---|
| Thumbnail Image | 150 x 150 px | Used for post lists and small previews |
| Logo | 200 x 100 px | Size may vary based on your logo design |
| Featured Image | 1200 x 630 px | Optimized for social media sharing |
| Blog Post Image | 1200 x 630 px | For header images in blog posts |
| In-Content Image | 1024 px width | Height varies based on aspect ratio |
| Background Image | 1920 x 1080 px | For full-screen background support |
| Product Image | 1000 x 1000 px | For proper display of products |
| Gallery Image | 1024 px width | Height varies based on aspect ratio |
While the size chart provides a good starting point, there are several important factors to consider for each image type:
1. Thumbnails
As mentioned above, you can customize your thumbnail dimensions. However, consider your theme’s design when setting these – for a grid layout, square thumbnails (e.g., 300 x 300 pixels) often work best. For a more traditional blog layout, you might prefer rectangular thumbnails (e.g., 300 x 200 pixels).
2. Logos
Your logo is often the first element visitors notice, so it needs to look good in various sizes. While 200 x 100 pixels work well for many sites, consider creating a scalable vector graphic (SVG) version of your logo.
SVGs remain crisp at any size and are perfect for retina displays. If using a raster format (like PNG), provide a larger version (e.g., 400 x 200 pixels) to ensure clarity on high-resolution screens.
Always test your logo on mobile devices to ensure it remains clear and recognizable when small.
3. Featured and Blog Post Images
The recommended 1200 x 630 pixel size is optimized for social media sharing, particularly Facebook. Featured images typically display at full width in single-column layouts, making 1200 x 630 pixels the minimum recommended size. For themes with wider content areas, consider using 1600 x 900 pixels or even 1920 x 1080 pixels to ensure crisp display on all devices.
However, if your theme uses wider layouts, you might go up to 1600 x 900 pixels. Keep in mind that these images often need to work in multiple contexts – as a header on your blog post, a thumbnail in your blog index, and a preview image when shared on social media.
4. Content and Gallery Images
While 1024 pixels wide is a good general guideline, the ideal size depends on your theme’s content width. For standard content areas (600-800 pixels), images at 1024 pixels wide provide excellent quality while remaining performant. Full-width images that span the entire viewport should be at least 1920 pixels wide, with 2560 pixels recommended for ultra-wide displays. Hero images and full-screen galleries benefit from even larger dimensions – consider 3840 x 2160 pixels for truly stunning visuals on 4K screens.
For WordPress galleries, uploading larger images (around 2000 pixels on the longest side) allows WordPress to create various sizes, giving you flexibility. This is particularly useful if you’re using a lightbox feature that displays full-size images.
5. Background Images
For full-screen background images, 1920 x 1080 pixels (full HD resolution) is a good starting point. Background images should be at least 1920 x 1080 pixels to cover most desktop screens without pixelation. For sites targeting users with high-resolution displays, 3840 x 2160 pixels (4K) ensures sharp backgrounds on all devices. However, with the increasing prevalence of 4K displays, you might consider going even larger – perhaps 3840 x 2160 pixels.
The trade-off is larger file sizes, so use your judgment based on your audience. If you’re using a repeating pattern or texture, you can often get away with a much smaller image – such as 400 x 400 pixels – that tiles seamlessly.
6. Product Images
Consistent sizing is key for product images. The recommended 1000 x 1000 pixel size allows for zoom functionality while keeping file sizes manageable.
However, if you’re selling products where fine detail is important (like jewelry or electronics), you might want to go larger – perhaps 2000 x 2000 pixels. Remember to use a consistent aspect ratio for all product images to maintain a uniform look in your product galleries.
Whichever size you choose, the rule of thumb is to always keep size to a minimum, as large images can slow down your site. Also, remember to keep the main focus of the image near the center, with ample space above, below, and to the sides. This helps to maintain the focus of the image, even if it does get cropped.
How Do I Optimize My Images for WordPress?
When you upload an image to WordPress, a lot happens behind the scenes. Understanding this process can help you avoid mistakes with your website’s images and overall performance.
As soon as you hit that upload button, WordPress springs into action. It analyzes your image, creates multiple versions of it in different sizes, and stores them all for various uses across your site. This automatic processing aims to ensure your images look great and load quickly, regardless of where they’re displayed – be it a full-width header, a thumbnail in a blog post, or anywhere in between. There are three key factors to consider when it comes to optimizing images:
1. WordPress Image Size Limitations
You might be wondering if there’s a limit to how big your images can be. For optimal performance, keep image file sizes under 150KB for standard images and under 500KB for hero images or full-screen backgrounds. Beyond these performance guidelines, your server imposes hard limits on file upload sizes:
- PHP memory limit: Your server’s PHP memory limit can restrict the maximum image file size. Large images require more memory to process.
- Upload file size limit: WordPress has a default maximum upload file size, which can be adjusted in your php.ini file or through your hosting provider.
2. File Formats: Choosing the Right One
WordPress supports several image file formats, each with its own characteristics:
- JPEG/JPG: Best for photographs and complex images with many colors. Use JPEG for blog post images, featured images, and photo galleries where quality matters but file size needs to stay reasonable.
- PNG: Essential for logos, icons, and graphics requiring transparency. Choose PNG when you need crisp edges, text overlay, or transparent backgrounds in your design elements.
- GIF: Limited to simple animations and basic graphics with 256 colors or less. Reserve GIF for animated elements or extremely simple graphics.
- WebP: Modern format offering 25-35% better compression than JPEG/PNG. Ideal for all image types but requires fallbacks for older browsers.
- SVG: Perfect for logos and icons that must scale infinitely without quality loss. Use SVG for simple graphics but implement security measures as these files can contain code.
You can change an image’s format using image editing software like Adobe Photoshop or Canva, or with a dedicated tool like a GIF compressor.
3. File Size
While WordPress doesn’t impose a specific file size limit, it’s crucial to consider file size for the sake of your site’s performance. Larger files take longer to load, which can frustrate visitors and negatively impact your search engine rankings.
When you upload an image, WordPress automatically compresses the JPEGs. This can reduce file size without significantly impacting quality, but it’s not a cure-all. It’s still a good idea to optimize your images before uploading them.
The process of reducing the file size while retaining the image size is called image compression. There are various ways to do this, such as using image editing software or image optimization and compression plugins. These can often reduce file size without sacrificing image quality. To further help with performance, WordPress includes native support for lazy loading images. This means images don’t load until they’re about to scroll into view, which can significantly improve perceived loading times, especially on pages with many images.
4. Image Resolution and DPI
Dots per inch (DPI) is used to indicate the quality of an image – the more dots per inch in your image, the better the resolution. However, for web images, DPI is less important than pixel dimensions. 72 DPI is the standard for uploading images to the web; a higher DPI will only increase your file size without improving the display quality on most screens.
You can change your image’s DPI using image editing software like Adobe Photoshop or other online tools. Remember, for web use, it’s more important to focus on the actual pixel dimensions and file size rather than DPI.
How Do I Optimize Image Galleries for WordPress?
Optimizing and configuring the display options for lots of images can be time-consuming, which is why so many WordPress website owners look to image galleries as a solution. In a gallery, image size can usually be handled both individually and in a time-saving bulk manner, at the gallery level.
With an array of optimization options, image galleries provide a relatively hassle-free way to showcase your images, whether on your homepage, blog posts, or product pages. They’re particularly useful if your site features lots of photography, or if you run an ecommerce store where high-quality product imagery is a major driver of sales.
For this reason, many website owners, particularly ecommerce store owners, manage their photo galleries with a plugin like FooGallery PRO Commerce.
FooGallery is a leading, dedicated gallery plugin that comes with three paid plans – each one adding more functionality, up to the full suite of features you get with FooGallery PRO Commerce, several of which will help you to manage images effectively. You can use FooGallery PRO Commerce to ensure your gallery images are displaying beautifully and that your products are looking their best.
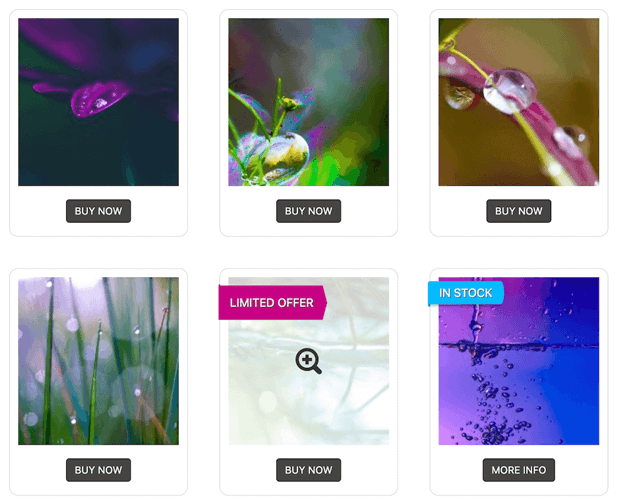
Offering deep WooCommerce integration, FooGallery PRO Commerce was designed with page speed as a top priority. It offers built-in lazy loading, meaning that galleries load lightning fast, and gallery images are indexed by search engines. Your galleries will be responsive too, so that the images will always look great when viewed on mobile.
The plugin comes with a range of attractive gallery layouts like grid, masonry, or carousel and even a dedicated product gallery template, for ecommerce purposes.
With FooGallery PRO Commerce, you can quickly and easily set up galleries in which all of the images will be displayed according to your preferences.
You can:
- Automatically scale images while maintaining their original aspect ratios.
- Easily generate thumbnails for your images and set custom thumbnail sizes.
- Adjust the size of thumbnails in the thumbnail strip in your gallery lightbox.
- Tweak image details like borders, spacing, and alignment.
FooGallery PRO Commerce lets you enhance images in various ways, too. For example, you can:
- Add effects, such as hover effects, to images within a gallery.
- Add custom captions to images, which is ideal for various use cases, such as giving customers more information about a professional photograph or product.
Managing Your Website’s Images with FooGallery PRO Commerce
Optimizing images for your WordPress site is crucial for maintaining performance, user experience, and search engine rankings. By understanding how WordPress processes images and following best practices for image sizes, formats, and compression, you can significantly improve your site’s speed and visual appeal.
While manually managing images can be time-consuming, especially for sites with extensive galleries or ecommerce products, tools like FooGallery PRO Commerce can streamline this process without sacrificing quality. Try FooGallery PRO Commerce today and see the difference it can make for your website!