WordPress is not only a website or blog creation tool, it provides a hosting platform as well. This means that if you are just getting started with your site or blog, or you want to experiment, play around with and test out the many features of WordPress, you don’t need to manually install WordPress. Instead, you can let a hosting provider handle this for you.
Many users prefer to open a hosting account with web hosting platforms such as GoDaddy, Host Gator, Bluehost, or even WordPress itself, to name but a few. For a comparative look at the various web-hosting providers, check out this article or this article.
These hosting providers offer you server space for your website. In other words, they host your website on their server. They also generally provide a one-click WordPress installation. Using this option will allow you to quickly and easily set up WordPress on your site.
However, you may decide to set up your own server (using either your own private server or leasing a server from a hosting provider), from which you would create and maintain your website/s. This is referred to as self-hosting. For this, you would need to know how to manually install WordPress, download the files either from the WordPress directory or from a third-party site, and then upload these files onto the server using FTP.
To Self-Host or not to Self-Host
Managed WordPress hosting means that a company, such as WordPress, GoDaddy or Kinsta, will host your site. In this case, you wouldn’t need to install WordPress, but there are pros and cons to this option.
Pros of Managed WordPress Hosting
Optimized Infrastructure
When you choose a hosting package that includes a web server, the whole architecture of your site is in line with the server’s design. Everything from memory to server software has been optimized to host a site like yours. This means that your website is likely to run faster and with better security than other self-hosting options. You will also benefit from automatic updates, automatic backups, and easy data restoring.
Excellent Support
Managed hosting also comes with good support, which means that you don’t have to worry too much about the technical aspects of running your own server. And since your site and the host are under the same umbrella, should you encounter any problems, it is likely that they will be resolved quickly and efficiently.
No Installation Required
When using managed hosting for your site, you don’t need to install WordPress. Of course, some cheaper options may not include WordPress installation, in which case, read on to find out how you can do this manually.
Cons of Managed WordPress Hosting
Less Flexibility
For a highly customized site, if you choose managed WordPress hosting, you may encounter minor flexibility issues. You won’t be able to install other platforms on your sites such as Joomla or Magneto. Some plugins might be disabled by the host – this is usually for security or optimization reasons though, so this could be a good thing.
Higher Cost
While the cost of managed WordPress hosting is often reasonable – depending on the plan you select – it’s not difficult to find a web server that is less expensive.
Traffic Restrictions
A typical managed WordPress hosting plan will cap your site’s traffic at around 20,000 to 25,000 visitors per month. If your site exceeds that number of visitors, you will pay an overage fee – generally around $1 per 1,000 visitors.
How to Install WordPress Manually
If you do decide to go ahead with self-hosting, you will then need to install WordPress on that platform. There are several ways to do this. To manually install WordPress, you will need to use FTP (File Transfer Protocol). This doesn’t make WordPress any easier to install, but it is recommended as it provides more security than one-click installation options.
Manually Install WordPress via FTP
If this is your first time using FTP, it can be a bit intimidating. But don’t worry. We will go through the quick and easy process of installing WordPress step by step. Let’s get started.
Step 1 – Download WordPress
You can download the WordPress zip file here. It will take up 16.9 MB of memory. Make sure you unzip the file since you will be using an FTP client later, and FTP clients don’t accept zip files.
Step 2 – Download an FTP client
FTP (File Transfer Protocol) allows a user to transfer files – images, videos, plugins, etc. – from their computer to a web server. In order to use FTP, you will have to have a software program called an FTP client. Many FTP clients are free to use. For a comparative list of some of the more popular FTP clients, check out this article.
For the purposes of this tutorial on how to install WordPress, I will be using the FTP client Commander One for Mac OS.
Once you’ve opened your FTP client, find the “Site Manager”. It will be located either on the top toolbar as an icon or in the “Files” section drop-down menu. The FTP client will then display a pop-up menu like in the picture below (though in Commander One, you will need to select the FTP icon first).
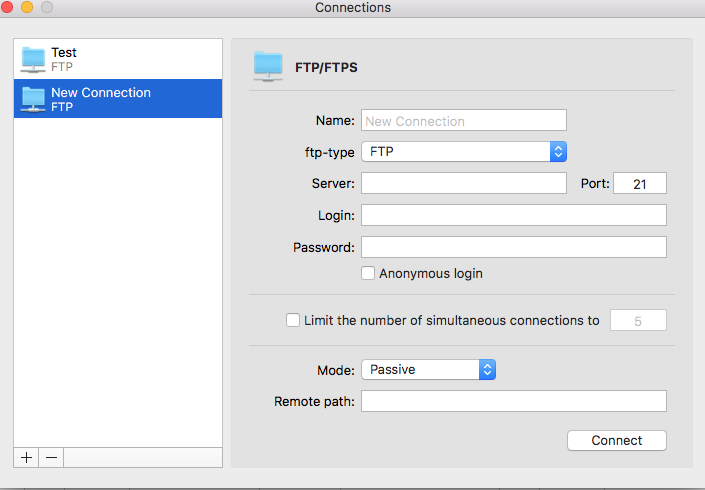
Step 3 – Enter Your FTP Credentials
In the first field, “Name:”, you need to create a new connection and give it a name. To fill out the other necessary fields, you will need FTP credentials, or identifiers such as the server number, login, and password.
Most web hosts (if you’re using one) will send you these credentials in a welcome email when you sign up for their service. If not, you will need to contact your web server and ask for these credentials. Generally, your FTP username and password will be the same as your cPanel username and password, and your hostname will be the same as your domain name.
Once you’ve filled in the empty fields with the information provided to you by your web server, click “Connect”.
Now, breathe a sigh of relief. You have successfully set up FTP on your computer.
Step 4 – Upload WordPress From Your Computer to Your Website Server
On the left-hand side of your FTP client are all the files of your local computer. On the right-hand side, there should be the server you have just connected to, displayed with the name you gave to the connection. From the left-hand side, find the WordPress folder you downloaded earlier. In order to upload WordPress, first, open the folder. Select all the contents and drag and drop them into the empty space on the right side of the double panel.
When the pop-up screen appears, asking you to name the file destination, simply disregard it since the WordPress file you’re uploading contains an index which your server will use to organize it. Instead, leave that field blank and simply click “OK”.
Depending on your internet speed, uploading WordPress to the server could take several minutes (even an hour).
Step 5 – Create a Database in cPanel
You need to log in to your host’s control panel and find the section labeled “Databases” or “My SQL database”. Every host is different, so if you’re having a hard time accessing the control panel, look instead for MySQL Database or MySQL Databases. From there, select “Add Database”.
You will then be prompted to enter the MySQL database and user information – a database name, database username, and username password, which you will then need to give to WordPress once the database has been created.
The user you create still needs to be granted access to the database. Don’t forget to assign the user all privileges.
Step 6 – Update the Database Information in WordPress
You’re almost finished. Just a simple entry to complete the WordPress installation.
Enter your site where you’ve uploaded WordPress. You will see that WordPress is asking you to select a language for the rest of the installation process. Select the language you wish to continue in and click on the blue box at the bottom “Continue”.
Now, you will be prompted to enter the database name, user name, and password of the database you created. Once you’ve finished, click on the box labeled “Submit”. WordPress will now connect to your database and show you a success message. Click on the box labeled “Run the installation”, and you will be prompted to enter information about the site – site title, user name, password, and your email.
On this screen, you have the option to hide your site from search engines – at least until it’s set up the way you want it with plugins such as WordPress Notification Bars, photo and video galleries, and more.
Once you’ve finished entering the necessary information to install WordPress, you’re ready to complete the installation. Simply click on the box at the bottom labeled “Install WordPress”. You will then see a success message with your user name and password, inviting you to log in to WordPress.
What Now?
Congratulations. You now know how to manually install WordPress onto your website. You now have all the tools you need to make your website look and perform its best to attract and engage visitors to your site … almost.
WordPress is a dynamic website building tool. But it’s merely a framework, a skeleton that needs to be fleshed out with plugins. Now that you’ve done the hard part of installing WordPress on your website, don’t stop there. Add easy-to-use, high-performance FooPlugins and get the features that will help your site stand out from the others, with video galleries, hover effects, a gallery lightbox, animated loaded effects, WordPress notification bars, and much more.
Find a range of plugin options at FooPlugins.