FooBox is a responsive image lightbox. It allows you to open images, forms or other custom html code in a lightbox that automatically adjusts to the size of your screen. The FooBox PRO settings and themes allow you to customize your images to create a unique look and feel. Here’s a guide to using these settings.
FooBox Settings
To access the settings for FooBox PRO, find FooBox in your WordPress menu, hover on this and then select Settings. Alternatively, click on FooBox and select the Look & Feel tab.
The settings that you select will apply to any of the images that open in FooBox, so you’ll only need to select your settings once. If you use FooBox as your default lightbox in your galleries, then these settings will also apply to your galleries.
Choose a Theme
You can start customising your images by choosing a theme. There are three options to choose from.
The first is Rounded; this look adds a border around your images with slightly rounded corners. The arrows, which allow you to navigate to other images on that page, appear on the sides of the lightbox with this theme.
The Metro Theme also has a border, but without the rounded corners. This theme is more contained within the box and the the arrows appear at the top.
The last of the FooBox PRO themes is the Flat theme. This doesn’t include borders, but does have the directional arrows. These appear on the side of the lightbox.
Here’s a look at how the same image appears in FooBox PRO in each of the different themes. You can see the social share buttons displayed above the image, and the title and captions displayed below.


Customize Your Theme
Once you’ve chosen your theme, you can adjust the settings to suit the look and feel of your site. Here’s a quick look at the settings.
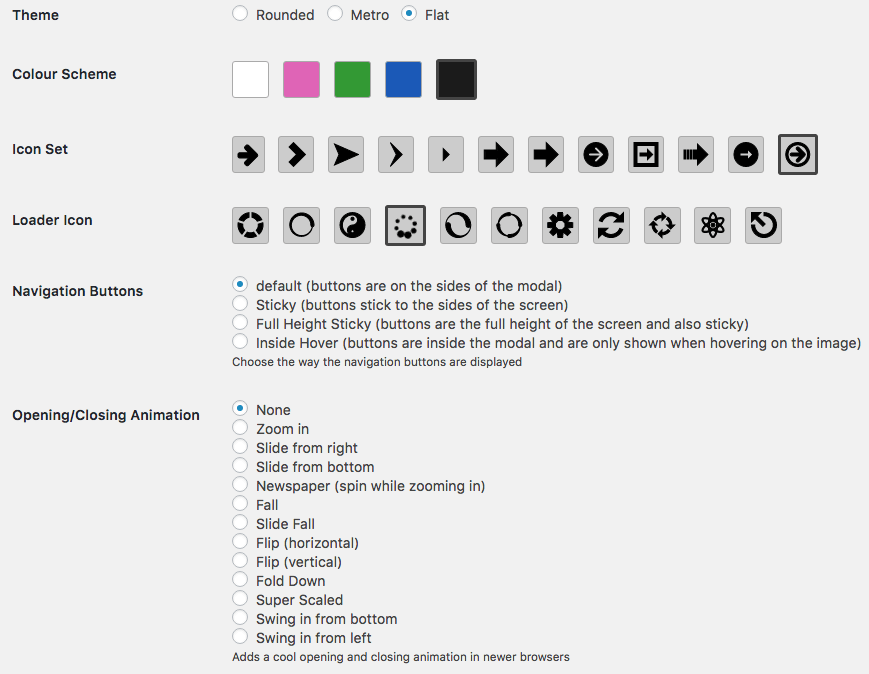
The color scheme determines the color of the lightbox and border. This is less noticeable in the Flat theme, whereas the border will change to this color in the Rounded and Metro themes.
You have two icons to choose. The first is the arrow icon, for your navigation arrows. The second is your loading icon, displayed when your image is still loading.
You can also select how and/or where the navigation arrows are displayed. The default setting places the arrows on the sides of the modal. The other settings allow you to change this, so for example, the arrows are displayed on the sides of the screen or just on hover.
The final setting determines your opening or closing animation. In other words, when someone clicks on your image, it can flip, spin, slide or fold out into the lightbox.
Load Your Images
All that’s left to do is add your media to your pages or blog posts. On WordPress, you’ll do this by hitting the Add Media button when you’re creating your page or post. You can upload your selected image and fill in your Title, Alt Text and Description as usual.
You’ll then need to scroll down a little further, to where it says Attachment Display Settings. Make sure you link to the Media File and that the image URL displays beneath this.
Then you’re done! Publish your page and your readers will be able to open the images in FooBox PRO.
Try it for yourself! Find the right FooBox PRO plan here.