Now that you have your environment setup correctly, let’s start coding and make a WordPress plugin, your first! I think it will be easier to follow by example, so we will be creating the first version of our FooDocs documentation plugin in this post. These are the steps we will follow:
- Create a new git repository.
- Clone the repository to our local WordPress’ plugin folder.
- Create a plugin file.
- Define our plugin class.
- Hook up some actions.
- Register a custom post type.
- Active and test the plugin.
- Commit our changes.
Create Git Repository
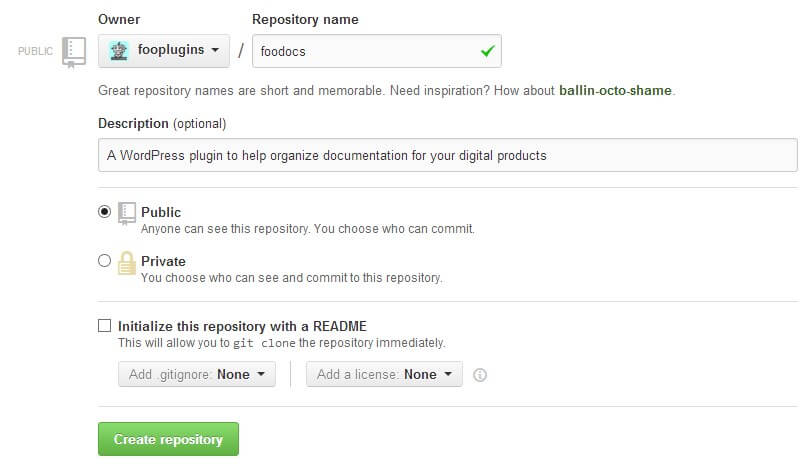
I am going to be using GitHub for my source control, as I love it and I think you should try it out. If you do not feel comfortable using git from the command line, then have no fear, download GitHub For Windows or Mac. Windows users can also try SmartGitHG as Matt suggested last week. I will be using GitHub for Windows for this series. Open the GitHub wesbite and sign in. Then click the create new repository link on the top right and add your new repo:
Clone Repo To Plugin Folder
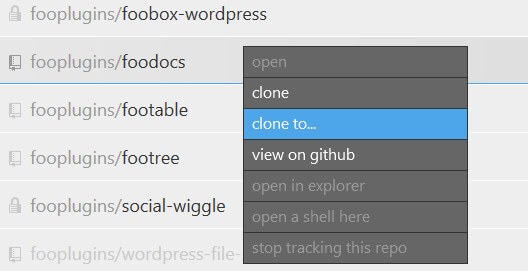
This is an important step that can save you a lot of time down the line. You want to clone the newly created repo directly to your WordPress plugins folder located in the wp-content folder (do not create a folder for your plugin, as cloning to the base plugin folder will create this folder for you). This makes testing and code changes extremely easy, and most importantly, allows you to commit changes to GitHub as you go. Remember, you can always roll back changes at any point!
Alternatively, you can use the command line to do the same thing. Navigate to your wp-content/plugin folder and then type something similar:
$ git clone https://github.com/fooplugins/foodocs.git
After you have cloned it, you should find a new folder in your plugins folder. In my example it is called foodocs. Now let’s write some code!
Create Plugin File
We need a way to tell WordPress about our new plugin. And to do that we need to create a PHP file with some specific comment headers at the top. Create a php file with the same name as your folder name. In my example I now have a blank file at the following path wp-content/plugins/foodocs/foodocs.php
Open that file in your favourite editor. The first thing we need to do is add some special PHP comments that WordPress will use to identify the plugin and all it’s information. We only care about the following for now:
- Plugin Name – the name of your plugin.
- Plugin URI – a url to your plugin GitHub page, or to a page sales page, or a product support page (your choice really).
- Description – a description of what your plugin does.
- Author – you or your company details.
- Author URI – link to your personal or company website.
- Version – the version number for the plugin.
More info about these headers can be found on the WordPress codex. Here is the plugin header information for FooDocs:
<?php
/*
Plugin Name: FooDocs
Plugin URI: https://github.com/fooplugins/foodocs
Description: Organized documentation for your digital products
Author: FooPlugins
Author URI: https://fooplugins.com
Version: 0.1-alpha
*/
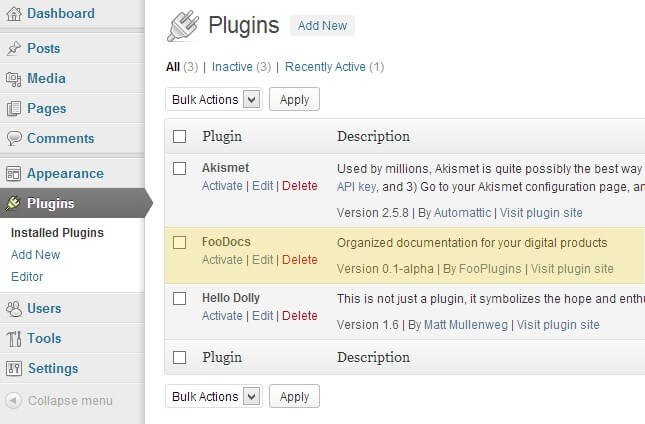
Now if you go to your plugins listing in your WordPress backend, you should see your new plugin in the list with all it’s details: Well done, you have created your first WordPress Plugin! It does absolutely nothing, but it is still a milestone. Now would be good time to commit your changes into git. Remember: commit changes often!
Define Our Plugin Class
I have read my fair share of WordPress plugin tutorials, and usually at this point, the author would tell you to choose a unique function prefix to use in your plugin. I do not agree with this! My reason is simple: there is too high a risk that another WordPress plugin or core function will use the same prefix. Take the safer bet and wrap your functions within a class.
Defining a class for our plugin will allow us to combine all the functionality of our plugin within a single logical “component” or “object”. Read this excerpt from the Writing A Plugin article on the WordPress codex:
“All the functions in your Plugin need to have unique names that are different from functions in the WordPress core, other Plugins, and themes. For that reason, it is a good idea to use a unique function name prefix on all of your Plugin’s functions. A far superior possibility is to define your Plugin functions inside a class (which also needs to have a unique name).“
So come up with a unique class name and define it:
if ( !class_exists('FooDocs') ) {
	class FooDocs {

	}
}
We have now defined our class, so let’s add some code to it.
In this example I am going to create 2 functions. One is the constructor, which runs when the class is instantiated (which basically means when it is created in memory), and another function that will create a simple custom post type. These functions will be empty for now:
if ( !class_exists('FooDocs') ) {
	class FooDocs {

		function __construct() {
			//this runs when the class is instantiated
		}

		function register_custom_post_type() {
			//this is where I will register my custom post type
		}
	}
}
Notice how I did not need to prefix my function name, but rather, I named it something logical like “register_custom_post_type”. You gotta love classes!
So we have defined this class called FooDocs, but it is never loaded into memory at all, so let’s instantiate it. You do this simply by calling new Your_Class_Name() after the class definition. In my example:
new FooDocs();
But to follow best practices, we need to do more than just instantiate our object. We need to assign this new object to a variable, so that you (and potentially other developers) can use it down the line. We are going to use $GLOBALS to store the class object we are creating:
$GLOBALS['FooDocs'] = new FooDocs();
[note color=”#69BC3C”]Note: In the next post we will refactor this code to use another pattern, but for now, this is simple and it serves our purpose.[/note]
Hook Up Some Actions
In the FooDocs plugin, I want to create a new custom post type, so that I can capture document content. So in order to do that I need to register the custom post type. We already have a placeholder function for this, but I need to call that function at the correct time. We need to use WordPress actions to wire up everything.
So let’s hook up our register_custom_post_type function from the __construct function, as we know that will be called when a FooDocs object is instantiated (loaded into memory). The new __construct code will look something like:
function __construct() {
	//this runs when the class is instantiated
	add_action( 'init', array($this, 'register_custom_post_type') );
}
There are a few things to note here:
- We hooked up the action using the add_action function.
- We hooked into the init action, which runs after WordPress has finished loading.
- We pass an array as the second parameter:
- $this is the current instance of the FooDocs object we are dealing with.
- ‘register_custom_post_type’ is the function we will be calling within the class.
[note color=”#69BC3C”]Note: Hooking up actions to functions within a class instance can be a bit tricky to get your head around at first, especially if you are used to using prefixed function names.[/note]
Register A Custom Post Type
I generated my custom post type code using my CPT code generator on my personal site. There are a couple of these CPT code generators out there now, so take your pick. If this is the first time you are registering a custom post type, then read the register_post_type codex documentation and write it from scratch.
function register_custom_post_type() {
    $labels = array(
        'name' => __( 'Documentation', 'foodocs' ),
        'singular_name' => __( 'Documentation', 'foodocs' ),
        'add_new' => __( 'Add New', 'foodocs' ),
        'add_new_item' => __( 'Add New Documentation', 'foodocs' ),
        'edit_item' => __( 'Edit Documentation', 'foodocs' ),
        'new_item' => __( 'New Documentation', 'foodocs' ),
        'view_item' => __( 'View Documentation', 'foodocs' ),
        'search_items' => __( 'Search Documentation', 'foodocs' ),
        'not_found' => __( 'No documentation found', 'foodocs' ),
        'not_found_in_trash' => __( 'No documentation found in Trash', 'foodocs' ),
        'parent_item_colon' => __( 'Parent Documentation:', 'foodocs' ),
        'menu_name' => __( 'Documentation', 'foodocs' ),
    );

    $args = array(
        'labels' => $labels,
        'hierarchical' => true,
        'description' => 'Documentation for a your digital products',
        'supports' => array( 'title', 'editor', 'author', 'thumbnail', 'custom-fields', 'comments' ),
        'public' => true,
        'show_ui' => true,
        'show_in_menu' => true,
        'show_in_nav_menus' => true,
        'publicly_queryable' => true,
        'exclude_from_search' => false,
        'has_archive' => true,
        'query_var' => true,
        'can_export' => true,
        'rewrite' => true,
        'capability_type' => 'page'
    );

    register_post_type( 'foodocs', $args );
}
A few things to note about this code:
- The labels are translatable by using the __ function. We will cover this in detail in a future post.
- We are setting a bunch of arguments when calling register_post_type, which I will not cover in this post. Read the docs.
- We are calling the post type foodocs. I use this unique name so that it does not conflict with other custom post types that might also be called ‘documentation’.
Activate and Test Your Plugin
[note color=”#69BC3C”]Note: Before you activate your plugin, remember to make sure you are running your local WordPress install in debug mode, so that you can easily pick up any errors.[/note]
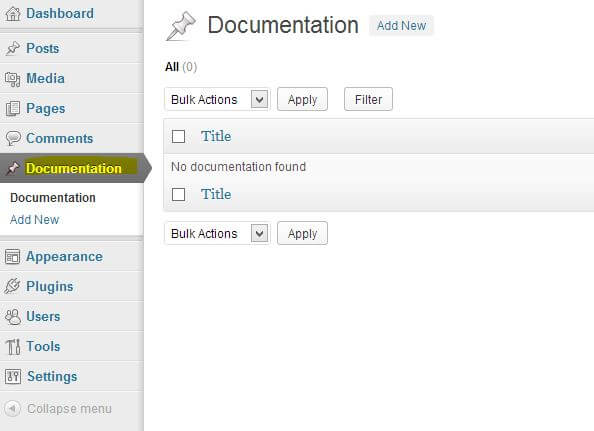
Now activate the plugin. Hopefully there are no PHP errors or warnings, and you should see a new menu item where you can manage your newly created custom post type.
Commit Changes To GitHub
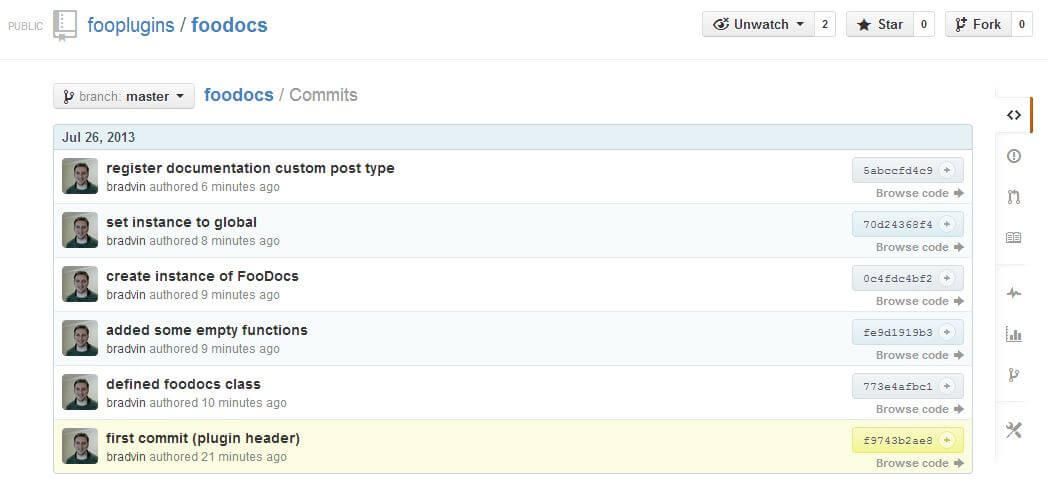
As I said before, it is a good idea to commit changes often. I try to keep my commits quite small and group them by individual change or feature. If you have been committing changes as you go, you should have a couple commits under your belt already. Check my commits I made so far for the FooDocs plugin.
New Terminology
Some terminology we have learned in this post:
- class – we define a class to represent an object or concept. In our case, our class will contain the core plugin functionality.
- instantiate – to create an instance of our class in memory, so that we can use it.
- constructor – a function within a class that is automatically called when we create an instance of the class.
- action – a WordPress hook which allows us to run code at a specific time.
- custom post type – a piece of content that is stored within WordPress other than the usual posts and pages.
Lessons Learned From Matt
Matt’s follow-up post is great this week, as he goes through troubleshooting some issues he had when registering the custom post type.
What’s Next
In the next post, we will rework the plugin code and split up different functionality into separate files. We will also make the plugin translatable and add some readme files. See you next week!