As mentioned in the introduction post, before you write a single line of code to make a WordPress plugin, you need to prepare both your environment and yourself, to start writing code.
A lot of tutorials just jump in and miss the fundamentals. I believe that without the fundamentals, you might as well not even start. Think of this post as an upfront investment – a down payment if you will. Getting my development environment setup correctly from the start has literally saved me weeks worth of time over the last couple of years.
Here is the list of what we will be covering:
- Install WordPress locally
- Turn On WordPress debugging
- Choose which source control to use
- Learn WordPress core concepts
- Choose a good IDE (optional)
- Setup IDE debugging (optional)
As In Life, You Have Options
Early on, Adam and Matt pointed out that the majority of readers will likely be at a beginner level, and that some of these steps may be too difficult. That is cool, and also the reason why I have made some things optional.
If you are a hardcore PHP developer already, and you want to take WordPress plugin development seriously, then complete all the steps. Alternatively, if you are a web designer and are only interested in getting started with WordPress plugins, then leave off the optional steps.
The last thing I want is for you to get stuck, or even worse, scare you away. Remember, we are here to learn and also have fun!
1. Install WordPress Locally
Installing WordPress locally seems like the logical first step, and besides, you need a way to test the plugin you are going to write. And you need to do this locally so that you can debug and test with speed.
Please note: there are many ways to configure and install WordPress locally on your PC or Mac. If you already have this mastered, then move on.
Read Installing WordPress from the codex, or if you have a Windows PC like me, simply install WordPress using the Web Platform Installer. Also check out these great tutorials to help you along:
- How to Install WordPress Locally on Mac using MAMP – wpbeginner.com
- Installing WordPress On Mac Locally With MAMP – wpexplorer.com
- Install WordPress Locally on Windows with Xampp – fixrunner.com
- Installing WordPress On Windows Locally With WAMP – wpexplorer.com
- Install WordPress on Ubuntu 20.04 and Speed Up Your Sites – wpexplorer.com
If you have multiple local WordPress installs, then you need a quick way to manage your MySQL databases. I personally use HeidiSQL (Windows Based) for this, but you can also use the very popular phpMyAdmin if you are already used to it.
2. Turn On WordPress Debugging
Once you have WordPress installed you MUST turn on WordPress debug mode. The codex article Debugging in WordPress also lists a few more debugging options. The reason for this is simple: You need to know if your code is causing PHP errors or PHP notices. These warnings are given for good reason and you must strive to write code that gives zero PHP warnings or errors.
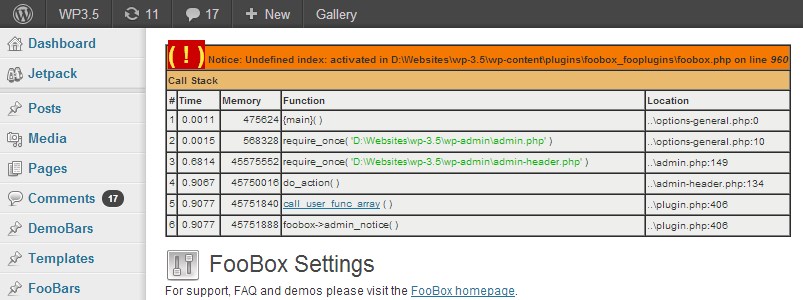
I find a lot of plugins and themes have PHP warnings which sometimes make the WordPress admin very difficult to use. Please inform the developer of the plugin or theme about this! These errors and warnings need to be fixed.
Here is an example of how these warnings mess up the admin interface:
3. Choose Which Source Control To Use
Notice how I didn’t say “Choose to use source control”, but rather “Choose which source control”. If you do not use source control and you write code, you are doing it wrong! Please do not get confused between keeping a backup of your code and using source control. Here are a few reasons why I recommend you use source control:
- Your code will never be lost. This is the obvious advantage. When you check code in or commit changes, they are stored on a server, so if your hard drive crashes you do not lose everything.
- You have a history. You can see what was changed and when. You can see when bugs were introduced and, most importantly, you can roll back to a point in time.
- You can code without fear! Because you now have rollbacks, you no longer need to comment out large blocks of code just in case you might need it later. You can even delete files or even whole folders if you want, without thinking twice. If you made a mistake, rollback.
- You can easily code in a team. Want to collaborate with another developer on the same plugin? No problem! You can merge your changes together when you check in.
Personally, I use both SVN and GIT. I use SVN for my plugins on WordPress.org and I use GIT for our Foo plugins as well as my personal stuff. Github is an amazing tool, and I recommend you open a Github account and start playing around today!
You have to check out this great video by Chris Coyier entitled Let’s Suck at GitHub Together:
In future posts I will also be walking you through how I do things using Github, so don’t despair!
4. Learn WordPress Core Concepts
Now you need to do some reading. First and foremost, you need to know what PHP is and how to write it. I am not going to go over that in this post, but here are some good places to start:
- What Is PHP? – php.net
- A Simple Tutorial – php.net
- PHP Tutorial – udemy.com
WordPress File Structure
Next, you need to know the WordPress file structure. In particular, you need to know where your new plugin will live. The WordPress plugin folder can be found at /wp-content/plugins:
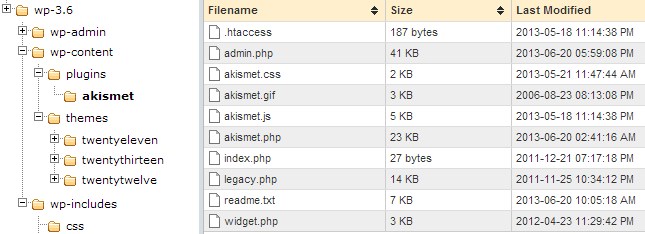
The above screenshot is taken from a page in our Gitub repo. It is a really cool interactive page where you can browse around a fresh WordPress 3.6 RC1 install! You can see the source for this page on Github.
Actions and Filters
The next most important thing to get your head around are WordPress Filters and Actions. Simply put, actions and filters allow you to “hook” into the WordPress core. All plugins use actions and filters to change the way WordPress works.
- Actions – often referred to as “hooks” or “events”. Actions “fire off” during the WordPress execution life cycle and allow you to run your plugin functions at specific times. For example, send a tweet after a post has been published.
- Filters – allow you to filter content directly through your plugin functions. For example, to alter the content of a post.
Read up about Writing a Plugin and the Plugin API from the codex, and also check out the action and filter references to see what hooks are available.
The beauty of the Action and Filter pattern is that you can also roll your own. This then allows you (and others) to extend your own plugins or override default functionality. We will be doing this in the plugin we write in this series.
WordPress Coding Standards
Tom Mcfarlin has written up a great series of posts about WordPress Coding Standards that I highly recommend. Check it out, as we will be following these guidelines throughout this series.
5. Choose An IDE (optional)
Firstly, what is an IDE? It is the program that you write code with. It is designed to help you maximize your programming productivity. When it comes down to writing code, do yourself a favour and use a tool that was built for the job of writing code. For WordPress development, I recommend the following:
- PHPStorm from JetBrains – I personally use and recommend you use this IDE!
- NetBeans – I used to use this before I found PHPStorm.
- Sublime Text – a great IDE with great plugins to help extend it.
- Coda 2 – another great one used by developers I respect.
Some reasons for choosing a good IDE:
- Code completion, so you do not need to know the exact function or variable name.
- Syntax error highlighting, so you can see errors before you run the code.
- Unused variable highlighting, so you can see which variables you declare but never use.
- Debugging, so you can step into your code and inspect variable values while the code is running.
- Go to definition, so you can click and view the source of WordPress core functions.
PHPStorm has all of these features and much more, and is really worth the $99 price tag. Also remember that you will probably be writing quite a bit of javascript and CSS code too, so if your IDE supports the above features for those languages aswell as PHP, then you are set.
6. Setup IDE Debugging (optional)
There are a lot of ways to debug WordPress plugins. You can log your variables to a log file, or dump them to screen. Both very easy to do, but at the same time very risky! You could, without realizing, check in code that does a var_dump of a variable, which completely messes up the WordPress admin. Trust me, I have done this before. Rather setup proper debugging in your IDE using XDebug. XDebug is a PHP extension which allows you to debug and profile your code directly from within your IDE. Setting up XDebug will allow you to:
- Break into your running code. Setup breakpoints in your plugin, and as soon as your code is executed, you are taken to the function with the breakpoint and execution is paused.
- Step through your code. There is nothing more powerful than being able to step through your code, line by line, and watch the variable values change as you go.
- Setup Watches. When you step into code, you can see the values of variables and also evaluate other expressions. You can even change the value of variables at run time.
This can be tricky to setup, but I promise you that the benefits will far outweigh any time you spend getting this working. Here are some online tutorials:
- Configuring XDebug with PHPStorm
- SublimeXdebug for Sublime Text
- Debugging PHP Source Code in the NetBeans IDE
What’s Next
In the next post, we will create our first Github repository, clone it to our locally running WordPress install, and start writing a WordPress plugin from scratch, by hooking into an action or two and setting up a custom post type.
Matt’s Response Post
Check out Matt’s response post, where he talks about this post, and what did or did not work for him. There is some great insight there for fellow learners.
Questions, Suggestions and Comments
Please ask a question that you are unsure about – others will probably have the same question.
What can I do better? Please make suggestions.
Did you enjoy the post? Please comment or share on your social networks.